Quick and easy scones

Quick and easy scones

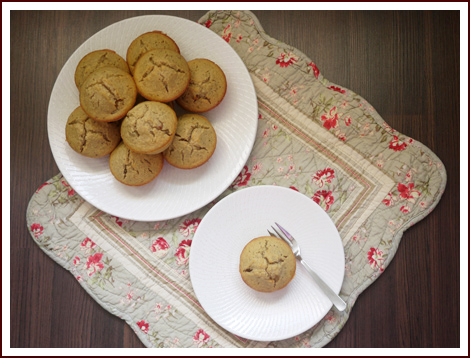
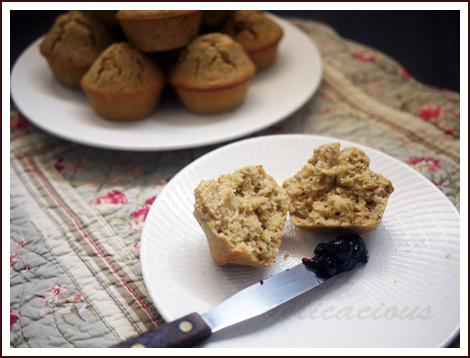
I woke up yesterday morning thinking about scones for breakfast. Earlier the previous day, I had bought a new bottle of chocolate rice crispies spread that I wanted to try and bread was just too… mainstream. Anyhow, decision for scones was made at 8am and piping hot scones were delivered to the table at 8.30am! These scones bake up tall and are so light and fluffy that you won’t be able to stop at one. I did try some with my new chocolate spread but quickly decided that jam and scones still taste the best. Alas, I did not have any clotted cream with me but butter and jam still tasted mighty good!

Are you craving for some scones too? These scones are sooo easy to whip up, especially because the recipe calls for ingredients that you probably already have at home. That’s right. No whipping cream required and no mixer needed too! Try the recipe and let me know how you like your scones.

Quick and Easy Scones
 
Prep time
Cook time
Total time
 
Tall and fluffy scones that can be whipped up in a jiffy!
Serves: 8 large scones
Ingredients
  • 175ml milk
  • 2 tsp lemon juice
  • 335g plain flour
  • ¼ tsp salt
  • 4½ tsp baking powder
  • 85g butter
  • 40g sugar
  • 1 tsp vanilla extract
  • 1 beaten egg
Instructions
  1. Preheat oven to 220°C. Centre an oven rack and place a baking sheet on it.
  2. Warm milk by heating it in a microwave for 20 sec or by sitting it in a basin of warm water. Add in lemon juice and set aside.
  3. In a large bowl, sift together flour, salt and baking powder. Whisk to combine.
  4. Grate 85g of cold butter into the flour mixture. Toss to combine. (Alternatively, cut butter into cubes and rub it into the flour mixture.)
  5. Stir in sugar.
  6. Add vanilla extract to the curdled milk mixture. Stir to combine.
  7. Make a well in the flour mixture and add the milk in.
  8. Using a spatula, roughly combine the mixture before tipping it out on a working surface. (I use a silicon sheet so that it's less messy.)
  9. Scatter some flour on top of the dough. Using floured hands, fold the dough a couple of times so that it's slightly smooth. There will still be some lumps and it's ok. Do not over work the dough.
  10. Pat it roughly into a 3 cm thick disc - don't roll it out using a rolling pin.
  11. Use a 5cm round cutter to cut out the scones. Gather the remaining dough, pat it out again and cut out the remaining scones.
  12. Remove the hot baking sheet from the oven. Place a silicon baking mat on it (or baking paper if you like) and arrange the cut out scones on the mat. Glaze with beaten egg and return to the oven for 10 min.
  13. Remove the scones from the oven and allow them to cool slightly. Serve warm with butter and jam. Enjoy!
  14. Note: If freezing scones, allow scones to cool totally, place them on a tray/plate and freeze for a few hours before storing in a ziplock bag. When needed, defrost and reheat at 160°C for a few minutes.
Notes
Recipe adapted from http://www.bbcgoodfood.com/recipes/4622/classic-scones-with-jam-and-clotted-cream

Breakfast Series – Potato pancakes with scrambled eggs and cheese

potato pancakes

Here’s a continuation of the breakfast series on Delicacious! This time, I’m sharing a recipe for savoury potato pancakes, topped with creamy scrambled eggs and a knob of cream cheese. Yummy! In the past, my family enjoys going out for weekend breakfast or brunch. We usually choose a location near to a park or playground so that my little one can run around too. Lately though, the rising costs of food prices and the dropping of food standards at some of our preferred haunts have resulted in us preparing weekend breakfasts at home. Not a bad thing, I must say.

These savoury potato pancakes were popular both with the hubby and my little one. They are crisp on the outside and soft on the inside. The scrambled eggs and cream cheese enhanced the flavours of the pancake. You can be creative and add smoked salmon or crisp bacon atop the scrambled eggs too!

I shared the recipe for this delicious breakfast at The Best Blog Recipes. Hop over and check it out!

Really Good Banana Muffins

banana muffins

How many recipes does one need for banana muffins? Just one really. A really good one. I’ve tried more than a couple of banana muffin recipes in the past years and this banana muffin recipe is definitely a keeper. There are a few tricks for good banana muffins. Firstly, make sure you use over-ripe bananas. When you have a bunch of bananas that are over-ripe and you don’t feel like baking just yet, peel them and freeze them for use later. Don’t throw them away! Personally, I find that the local variety “red meat bananas” make the best banana muffins/cakes/breads. My grandma calls them “ang bah jio”. Second trick – do not over mash the bananas. This gives the muffins a better texture. Lastly, use brown sugar for a more fragrant muffin.

Really Good Banana Muffins
 
Serves: 12
Ingredients
  • 2 cups plain flour
  • ⅔ cup brown sugar
  • ½ cup toasted coarsely chopped walnuts
  • ½ tsp baking soda
  • ½ tsp salt
  • 4 large ripe bananas
  • 2 eggs
  • 3 oz unsalted butter, melted
  • ¼ cup buttermilk
  • 1 tsp vanilla extract
Instructions
  1. Preheat oven to 180°C. Spray a 12 cup muffin tray with non-stick baking spray and centre an oven rack.
  2. In a large bowl, combine flour, sugar, walnuts, baking soda and salt.
  3. In a separate bowl, coarsely mash the bananas.
  4. Add beaten eggs, butter, buttermilk and vanilla and stir to combine.
  5. Add wet ingredients to the dry ingredients and gently fold (I use a whisk) to combine.
  6. Fill each muffin cup till ¾ full.
  7. Bake for 15-20 minutes, or until muffin tops are golden brown and a tester comes out clean.
  8. Cool to room temperature.

Healthy Whole Wheat Honey Berry Muffins

whole wheat honey berry muffins | Delicacious

I opened one of my kitchen cabinets about a week ago and found a hidden stash of honey tucked away in a corner. I didn’t even remember that I had put honey there! Or maybe someone rearranged the things inside the cabinet and… oh well, have you ever found things in the kitchen that you never knew were there? Finding honey was a good problem though. It meant that I could add honey instead of sugar to some of my baked goods, starting from these muffins.

These are healthy muffins, make no mistake about it. They are made with 100% whole wheat flour and contain no sugar and butter. They are wholesome and full of fruity goodness. Perfect for breakfast, and perhaps, an afternoon snack. Who says whole wheat baked stuff can’t taste delicious? I made these with a mix of blueberries and strawberries, and I really liked the result. They taste more complex and flavourful compared to my usual blueberry muffins; the strawberries add texture and moistness to the muffins. If you don’t like/have strawberries, you can replace the strawberries with more blueberries.Continue Reading

Toasted Oatmeal Muffins

oatmeal muffins 1

First thought that comes to mind when someone mentions oatmeal muffins? Do the words dry, bland, gummy come into mind? Well I was not quite a fan of oatmeal muffins, but THIS oatmeal muffin is very different. For one, it does not use oats whole, but uses toasted ground oatmeal. It has a distinct taste of oats with a fragrance likened to popcorn. Intrigued?

I came across this article on my Cook’s Illustrated magazine on oatmeal muffin. Those of you who read Cook’s Illustrated will know that they spend extended time testing recipes and refining them. They suggested that toasting and grinding up the oatmeal allows it to absorb liquid quickly, while giving it flavour. Who would have thought of doing that?

oatmeal muffins 2

Since I had an unopened packet of oats sitting around, I decided to give the recipe a try. Although muffins are typically fast to prepare, this one does take time. So if you are intending to make this muffin for breakfast, plan ahead! I didn’t and so my starving family had a late breakfast. Also, the original recipe calls for a streusel topping which I find sweet. I removed the streusel topping and added some raisins instead to sweeten up the muffin a little.

The resulting muffin was fragrant and moist. It went very well with jam and my family enjoyed it. This was baked in conjunction with Cook For Family‘s event which ends today.

Toasted Oatmeal Muffins
 
Recipe type: Muffins
Serves: 12 muffins
Ingredients
  • 2 tbsp butter
  • 2 cups rolled oats
  • 1¾ cups all-purpose flour
  • 1½ tsp salt
  • ¾ tsp baking powder
  • ¼ tsp baking soda
  • 6 tbsp butter, melted
  • 1¼ cup light brown sugar
  • 1¾ cups milk
  • 2 large eggs
  • 1 cup raisins
Instructions
  1. Using a non-stick spray, grease a 12-cup muffin tray.
  2. Melt 2 tbsp butter in a skillet.
  3. Add oats and cook, stirring frequently until oats turn golden brown.
  4. Transfer oats to a food processor.
  5. Process until finely ground, about 30 seconds.
  6. Add flour, salt, baking powder and baking soda and pulse till combined.
  7. In a large mixing bowl, whisk butter and sugar together till thick and smooth.
  8. Add milk and eggs and whisk till smooth.
  9. Using a large whisk, fold half of oat flour mixture into the egg mixture.
  10. Fold in remaining oat flour gently.
  11. Add raisins and stir to combine.
  12. Allow batter to sit for 15 minutes to thicken.
  13. Preheat oven to 190°C and place an oven rack in the middle position.
  14. Using an ice cream scoop, divide batter equally among 12 muffin cups. The batter should fill each cup to the brim.
  15. Bake for about 20 minutes till muffins are golden brown and a tester inserted in the middle comes out clean.
  16. Allow muffins to cool on wire racks for 10 minutes.
  17. Serve warm, or allow them to cool completely before storing.
Notes
Adapted from Cook's Illustrated magazine Muffins are best eaten the day they are baked. They can be kept in the fridge for up to 3 days and toasted before eaten.

I link up at these parties.

Homemade Granola

Homemade Granola The idea of making granola came the day after I accidentally bought a second pack of rolled oats, thinking that my box of rolled oats had expired. My helper reminded me that those were rather new too, and so being stuck with two packs of rolled oats, I knew I better be using them rather quickly.

So yesterday, it being the first day of the school holidays and I having to entertain my easily-bored two year old toddler, I decided to involve her in making granola. She had great fun scooping and pouring the rolled oats with this very cute whale measuring cup that I bought earlier from ToTT, stirring the mixture and sticking in her grubby little fingers every once so often. Sensory play for her perhaps?

Perhaps the only troublesome thing about making granola is having to check the oven quite frequently to stir up the mixture so that the granola bakes evenly. I neglected to check it for just a tat bit longer and it browned more in certain regions. Still it was delicious, definitely much more delicious than store-bought granola. The bub couldn’t wait for it to come out of the oven, declaring that it was hers.

Today’s breakfast? Granola, served up with cold milk.

Homemade Granola

Ingredients

  • 2 1/2 cups rolled oats
  • 1 cup sliced almonds
  • 3/4 cups golden flaxseed
  • 3/4 cups shredded coconut
  • 2 tablespoons dark brown sugar
  • 1/2 teaspoon sea salt
  • 2 tablespoons maple syrup
  • 2 tablespoons honey
  • 2 tablespoons vegetable oil
  • 1/2 cup dried cranberries
  • 1/2 cup raisins

Directions

Step 1
Preheat oven to 170°C. Position two racks near the middle of the oven.
Step 2
In a large bowl, stir together rolled oats, almonds, flaxseed, coconut and brown sugar.
Step 3
In a small bowl or measuring jug, whisk together oil, maple syrup and honey.
Step 4
Pour honey mixture into large bowl with oats and mix well with a spatula.
Step 5
Spread mixture onto two baking pans and bake for 20 minutes, stirring often to ensure even roasting.
Step 6
After 20 minutes, rotate pans and bake for another 15-20 minutes till evenly golden brown.
Step 7
Allow to cook before stirring in raisins and cranberries.
Step 8
Store in airtight containers.