Gula Melaka Agar (Palm Sugar Agar)

gula melaka agar

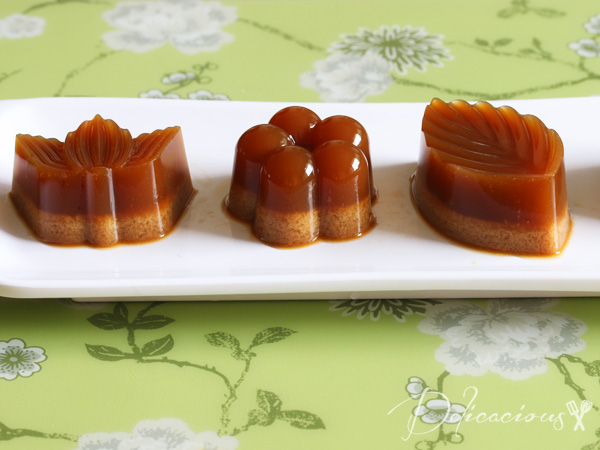
Gula melaka and coconut = a match made in heaven. How can anything with gula melaka and coconut not taste good? That probably explains why these little pieces of deliciousness were highly sought after at the last two gatherings that I brought them to. A few friends mentioned that it reminded them of their childhood, when their mothers or grandmothers used to make them these desserts. Did you know that this two layered agar was made from one mixture? That’s right, I did not create two separate layers – the layers separated on their own after cooling. That’s why this dessert is perfect – it’s a nostalgic crowd pleaser and it looks like you put in more work than you actually did. My friends thought that I took the time to make the agar layer by layer and were really surprised when I told them that I didn’t.

The recipe is pretty straight forward, but here are some tips to get the layers to separate nicely:

1) Ensure that the gula melaka and agar mixture is boiling before you pour in the coconut milk.
2) After your pour in the coconut milk, give it a quick stir and bring it to the boil. Turn off the fire immediately. Do not over-stir or the gula melaka and coconut milk mixture will homogenise and you will get a uniform coloured agar agar (which is still tasty by the way).
3) After you pour the agar into the moulds, allow it to cool and harden at room temperature first. This gives the mixture time to separate. Do not move the containers or the layers may not be as distinct. You can chill the agar after it has set.

4.7 from 3 reviews
Gula Melaka Agar (Palm Sugar Agar)
 
Author:
Serves: 24 pieces
Ingredients
  • 160g gula melaka, cut into chunks
  • 3 pieces of pandan leaves, tied into a bundle
  • 750ml water
  • 1 packet agar powder (10g - I used swallow brand agar)
  • 250ml coconut milk (I use Heng Guan - Pasteurized Fresh Coconut Milk)
  • pinch of salt
Instructions
  1. In a large pot, boil gula melaka, pandan leaves in water till gula melaka dissolves.
  2. Remove pandan leaves and sieve the gula melaka mixture to remove any sediments.
  3. Add agar powder and bring the mixture back to a boil. Stir to ensure the agar powder is well dissolved.
  4. Add salt to coconut milk and stir to combine.
  5. Pour coconut milk into boiling gula melaka agar mixture. Give it a quick stir and bring it back to a boil. Turn off the fire immediately.
  6. Pour into moulds and allow the agar to set. As it sets, it should separate into two distinct layers.
  7. Once set, chill agar till required. Enjoy!


Chocolate Ganache-filled cupcakes with Peanut Butter Buttercream

Chocolate Ganache-filled Cupcakes with Peanut Butter Buttercream

These cupcakes are likely the most decadent cupcakes that I’ve ever made. A moist chocolate cupcake topped with luscious peanut butter frosting. To up the decadent factor, I filled these cupcakes with a rich chocolate ganache. Gorgeous isn’t it? I baked 50 of these lovely beauties in two days. The first batch was for an office gathering and I ended up with so much left-over frosting that I baked another batch for my cell-group party.

To be honest, I didn’t originally plan to fill these cupcakes with ganache. However, I was inspired when I came across the Wilton filling tip on a trip to  Phoon Huat. Afterall, I had some leftover ganache from making the Chocolate Banana Cake, and thought, why not? More chocolate is always better, right? (By the way, I love love LOVE the filling tip. You don’t need to dig an ugly hole in the cupcake. Just stick the tip in and pipe away. Amazing.)

So there you have it. Chocolate ganache-filled cupcakes, topped with peanut butter buttercream. Don’t tell your guests that you’ve filled them with ganache. Watch their faces after they take a bite. You can also get creative with the filling. How about some chocolate liqueur ganache? That sounds pretty awesome too.

Chocolate Ganache-filled cupcakes with Peanut Butter Buttercream
 
Serves: 24 cupcakes
Ingredients
Chocolate Cupcakes
  • 1 cup cake flour
  • 1 cup plain flour
  • ¾ cup dutch-processed cocoa powder
  • 1 tsp baking powder
  • 2 tsp baking soda
  • 1 tsp salt
  • 1⅓ cup Demerara sugar
  • 2 eggs (room temperature)
  • ¾ cup vegetable oil
  • 1 cup buttermilk (Add 1 tbsp white vinegar and add milk to form 1 cup)
  • 1 cup hot coffee (1 tsp instant coffee granules dissolved in hot water)
  • 1 tsp vanilla extract
Chocolate Ganache
  • 60g dark chocolate couverture (I used a mix of milk and dark couverture)
  • ½ cup whipping cream
Peanut Butter Buttercream
  • 115g unsalted butter
  • 1 cup creamy peanut butter (I used Planters)
  • 1 cup icing sugar, sifted
  • 3 tbsp whipping cream
Instructions
Chocolate Cupcakes
  1. Preheat oven to 175°C and centre an oven rack.
  2. Fill a 12 hole cupcake tray with paper liners.
  3. In a large bowl, sift together the dry ingredients.
  4. In another large bowl, combine the wet ingredients.
  5. Add the wet ingredients to the dry ingredients and using a whisk and starting from the centre, slow combine till you get a smooth batter.
  6. Fill each liner till ¾ full.
  7. Bake for 17-20 minutes or until a tester inserted in the middle of the cupcake cups out clean.
  8. Cool cupcake tray and fill with the remaining batter. You should have 24 cupcakes in total.
  9. Allow cupcakes to cool completely on a wire rack before frosting.
Chocolate Ganache
  1. In a small pot, heat whipping cream till bubbles form at the side. Do not allow it to boil.
  2. Pour hot whipping cream over chocolate and whisk till chocolate melts.
  3. Refrigerate till semi solid for ease of piping.
Buttercream
  1. Using a standing mixer fitted with the paddle attachment, cream together butter and peanut butter.
  2. Add sifted icing sugar and cream on medium high speed for a few minutes till the frosting is light and fluffy.
  3. Add whipping cream and cream for another minute or so.
  4. Use frosting immediately, or refrigerate it for a short while so that it can set up a little for smoother piping.
  5. If using frosting that has been refrigerated for some time, whisk it up before use.
To Assemble
  1. Fill a piping bag fitted with the filling tip with semi-solid chocolate ganache.
  2. Insert ½ way into each cupcake and fill. Do not overfill or cupcake surface may crack.
  3. Fill a piping bag fitted with the 1M open star tip with the peanut butter buttercream.
  4. Pipe swirls or ruffles on each cupcake.
  5. Refrigerate for 30 minutes to allow buttercream to set up before serving.
  6. (For more stability in the buttercream, you can replace half the butter with shortening.)

Walnut Mooncakes (Improved)

Walnut mooncakes

Walnut mooncakes are one of our family’s favourites and I bake them every year. This year, I modified my usual recipe as I found it a little too crumbly. The pastry of the previous recipe doesn’t quite hold up when it’s cut. Besides some slight tweaks to the amount of butter and flour, I’ve also replaced baking soda with baking powder as baking powder yields a more neutral tasting product (since there aren’t any acidic ingredients). I’m very satisfied with the results and my hubby, little one and mum loves it.

Walnut mooncakes

I’ve added melon seeds and salted egg yolks (my favouite) to the mooncake but you can choose to omit these if you like. As for the amount of walnuts to use, it really depends on your preference. I like walnuts so I use large fresh walnuts. Make sure that the walnuts you use are raw ones and not salted/toasted ones though.

walnut dinosaur mooncakes

My hubby decided to join in the fun and made these dinosaur walnut mooncakes. I think he calls them dino-wal-saurus. I think they are totally adorable, though they are very time-consuming to make. He used black beans for the eyes, melon seeds for their teeth and walnuts for their scales. Check out their side profile below. He thinks that there’s a market for these lovely dino-wal-saurus and all dino loving boys would love to have one. I would love to hear your thoughts on his creation!

walnut dinosaur mooncakes

5.0 from 1 reviews
Walnut Mooncakes (Improved)
 
Serves: 30 - 32
Ingredients
Pastry
  • 350g Plain flour
  • 30g Custard Powder
  • 1 tsp baking powder
  • ¼ tsp salt
  • 50g Icing sugar
  • 250g unsalted butter
  • 1 egg
  • 1 tsp Vanilla Essence
Filling
  • 30g toasted melon seeds
  • 750g White Lotus Paste
  • 6-7 salted egg yolks (each cut into 6 pieces)
Before baking
  • 1 Egg yolk + 1 tbsp water (for glazing)
  • Walnut for decoration
Instructions
  1. In a large bowl, sift flour, custard powder, salt and baking powder together. Whisk ingredients together and set aside.
  2. In the bowl of a standing mixer set to medium high speed, cream sugar and butter together until slightly pale and fluffy.
  3. Gradually add in egg and vanilla and beat on medium high speed till fluffy and light.
  4. Fold in flour mixture in two parts. Refrigerate dough overnight.
  5. Bake salted egg yolks for 5 minutes at 160ºC. Set aside to cool. Cut each yolk into 6 pieces.
  6. Mix melon seeds with lotus paste. Divide fillings into about 25g each.
  7. Wrap a piece of salted egg yolk in each ball of filling.
  8. Take out dough from fridge and divide into portions of 20g each.
  9. Wrap fillings into dough and decorate with walnut.
  10. Apply egg wash on mooncakes and bake at 160ºC for 10 mins.
  11. Remove from oven and allow mooncakes to rest for 10 mins. Re-apply egg wash and return to oven and bake for another 20 mins or till golden.


Pandan Snow Skin Mooncakes

Pandan snow skin mooncakes

Mid-autumn festival is approaching and I’m back on the blog after a 2 months hiatus. I gave birth to my 2nd baby girl two months ago (she’s such a cutie) and have had my hands rather full. Now that she is slightly older, hopefully I’d have more time to blog (fingers very crossed). But I digress. Let’s go back to mooncakes.

I have fond memories of mini pandan snow skin mooncakes that my mom would buy from this old fashioned bakery near Alexandra during Mid-autumn festival. I was probably in my teens then and to me, those were really delicious snow skin mooncakes. They were freshly made, had a strong pandan flavour and the snow skin was very soft. Unfortunately, the bakery closed down a couple of years later and I couldn’t find similar mooncakes. So a couple of years ago, I decided to start making my own. One of the more popular mooncakes I’ve made are these Red Wine Berry Snow Skin Mooncakes.

Pandan Snow Skin Mooncakes

Continue Reading

Very Chocolatey Salted Brownies

Very Chocolatey Salted Brownies

Home renovation is depressing. Even when it’s just renovation of the toilets, the whole house gets messed up. One of the worse parts of renovation? I am deprived of my kitchen and my oven. I wish I could start baking with a vengeance once my renovation is over but with the baby due to arrive just a few weeks, that does not seem very likely either.

Anyway, while browsing through my food photos, I realised that I have not shared my favourite brownie recipe on the blog! These recipes are rich and fudgey and the salt on the top gives it extra crunch. I like to add some chocolate chips to the batter to give it a little extra bite but you can omit these if you prefer.

Very Chocolatey Salted Brownies
 
Serves: 16
Ingredients
  • 170g unsalted butter
  • 60g dark chocolate chips/chunks (I use 70% dark chocolate)
  • 45g unsweetened cocoa powder
  • 110g plain flour
  • 220g granulated sugar
  • 3 eggs
  • 1½ tsp vanilla extract
  • ½ tsp sea salt
  • ¼ cup semi-sweet chocolate chips (I use 55% dark chocolate) - optional
Instructions
  1. Preheat oven to 175°C.
  2. Line a 9-inch square baking pan with alumnium foil and coat lightly with non-stick baking spray.
  3. Melt butter and chocolate chips over a water bath or using a microwave, stirring occasionally.
  4. Allow butter and chocolate mixture to cool slightly.
  5. Sift flour and cocoa powder over the chocolate mixture and whisk in till combined.
  6. Whisk in the sugar till combined, followed by the eggs, one at a time.
  7. Lastly, whisk in the vanilla extract and salt.
  8. Fold in the extra chocolate chips if desired.
  9. Pour batter into the baking pan and smooth out the top using a spatula.
  10. Bake for 30 - 35 minutes, or until the centre is just slightly soft.
  11. Allow to cool in the pan for an hour. Refrigerate the brownies for 1 - 1.5 hours to allow them to set completely.
  12. Remove brownies from pan and peel off the aluminium foil.
  13. Cut brownies into squares and sprinkle a little extra sea salt on top.
  14. Serve at room temperature.

Breakfast series – Japanese Hot Cakes

japanese hot cakes

What’s the difference between japanese Hot Cakes and our usual pancakes? Well, japanese hot cakes are thicker and sweeter. They are very popular, and many use the Morinaga hot cake mix. Delicious though they are, they can be a little hard on the pocket, especially if you have many mouths to feed. Some time back, I came across a recipe on a japanese sweets website. As the instructions were all in japanese (and google translate was not very accurate), I had to fiddle around with it before getting it right. I also changed the ingredients slightly. The method for preparing the hot cakes is also slightly different from preparing pancakes. If you follow the instructions though, you should be able to get thick delicious hot cakes! It’s definitely cheaper than using the Morinaga hot cake mix too!

Breakfast series - Japanese Hot Cakes
 
Ingredients
  • 1 egg
  • 40g caster sugar
  • A pinch of salt
  • 110g milk
  • 40g sour cream
  • 20g unsalted butter, softened
  • 140g cake flour, sifted
  • 1½ tsp baking powder
  • 1 tsp vanilla extract
Instructions
  1. Whisk egg with sugar and salt till pale and thick.
  2. In a separate bowl or measuring jug, combine the milk, sour cream and butter.
  3. Add the milk mixture to the egg and sugar mixture and whisk to combine.
  4. Add the flour and baking powder to the wet ingredients in three parts. Fold in gently with the whisk. The mixture will be thick.
  5. Set mixture aside for about 10 minutes.
  6. Meanwhile, set aside a damp cloth and heat a griddle pan or cast iron pan over medium heat.
  7. Add a little oil (not too much) and spread evenly over the surface of the pan.
  8. Before cooking the hot cakes, place the pan on the damp cloth to cool the pan down slightly.
  9. Scoop ¼ cup of hot cake batter and pour it onto the pan from a height of about 25 cm.
  10. When bubbles form, flip the hot cake over and cover the pan for 1 - 2 minutes. Remove hot cake and repeat with the remaining batter.
  11. Serve hot, with butter and maple syrup.

Cookie Top Brownies

Cookie Top Brownies

In my humble opinion, there are few desserts that are as charming in their simplicity as brownies. Moist chocolate goodness, in a bar, or a slab, or in a cup, whatever your preference. I used to think that the best brownies were the ones that were oozing chocolate goodness, with bits of nuts in them, the crunch of the nuts contrasting with the soft texture of the brownie. I have since changed my mind about what the best brownies are. The best brownies are the ones I’m about to introduce to you – Brownies topped with Cookie dough, baked to a golden brown perfection. Crisp chocolate chip cookie atop a moist dark chocolate brownie. NOW THAT IS PERFECTION.

Cookie Top Brownies

Continue Reading