Cookie Top Brownies

Cookie Top Brownies

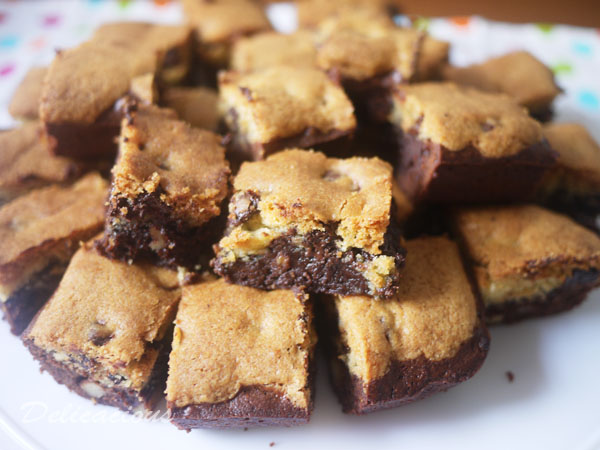
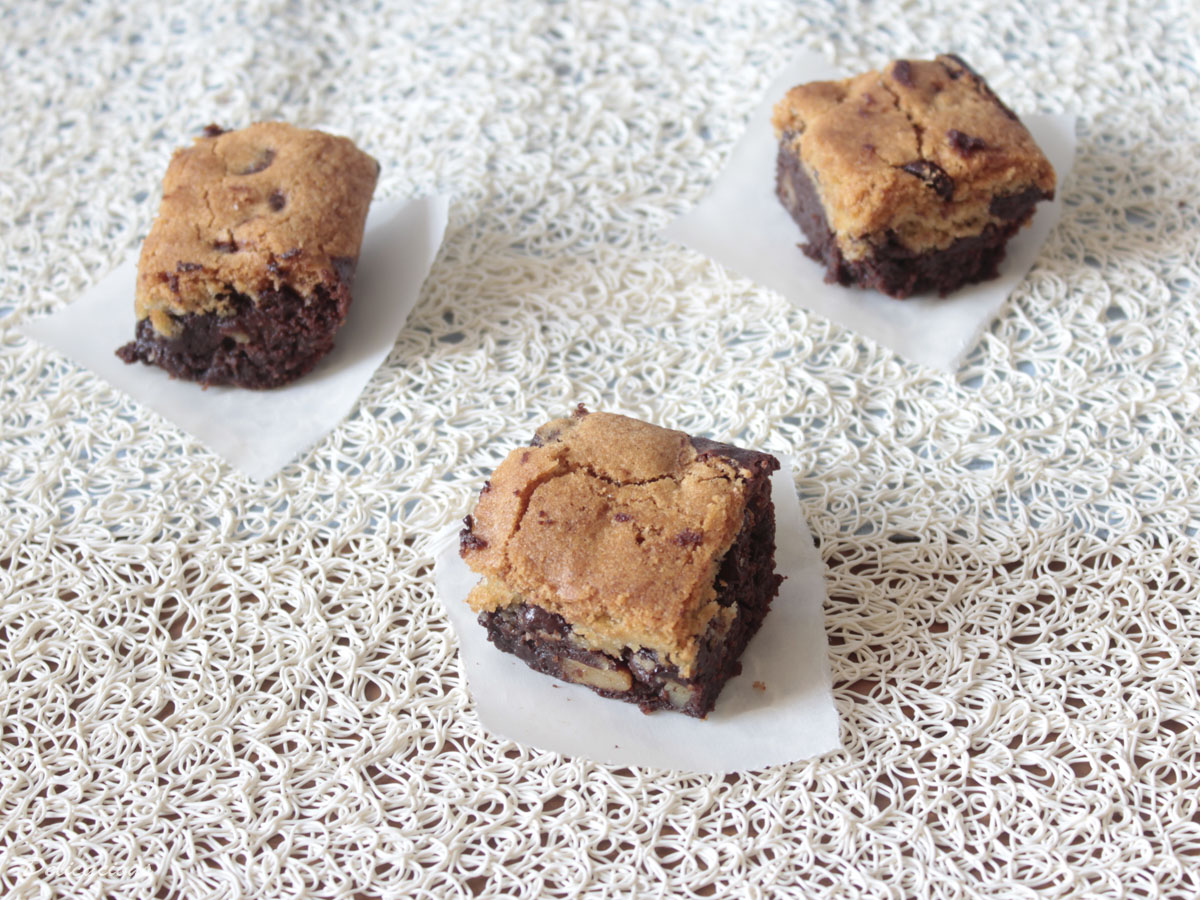
In my humble opinion, there are few desserts that are as charming in their simplicity as brownies. Moist chocolate goodness, in a bar, or a slab, or in a cup, whatever your preference. I used to think that the best brownies were the ones that were oozing chocolate goodness, with bits of nuts in them, the crunch of the nuts contrasting with the soft texture of the brownie. I have since changed my mind about what the best brownies are. The best brownies are the ones I’m about to introduce to you – Brownies topped with Cookie dough, baked to a golden brown perfection. Crisp chocolate chip cookie atop a moist dark chocolate brownie. NOW THAT IS PERFECTION.

Cookie Top Brownies

Continue Reading

Salted Coffee Chocolate Chip Cookies

Salted coffee and choco chip cookies | Delicacious

A couple of years ago, I picked up the sweet and salty bug. The bug that made me love all things that were a combination of sweet and salty – salted caramel, world peace cookies and even McDonald’s McGriddle Sausage and Egg muffins. Yes I am not kidding, even that. It is a really persistent bug because years later, I still love things sweet and salty.

About a week ago I was thinking of baking cookies and was combing through a couple of recipes, thinking of what to bake. I came across Amanda’s Brown Butter Salted Caramel Mocha Cookies and thought they were perfect. I wanted a cookie that was less sweet however, so I decided to omit the caramel this time round, increase the chocolate chips and add in cornstarch to make the cookies chewy. Yes – did you know that adding cornstarch to your cookie batter makes your cookies chewy in the middle? Try it. It works.

salted coffee and chocolate chip cookies 2

Continue Reading

Pistachio and Cranberry Biscotti

Cranberry and pistachio are two common ingredients. I suspect this is more to do with their colours than their flavours. Meaning to do something Christmasy, I decided to make cranberry pistachio biscotti by modifying a basic recipe from Dorie Greenspan’s book – Baking, from my home to yours. This recipe is interesting in that it incorporated cornmeal which added a surprising fragrance and crunch to the biscotti.

So did the cranberry and pistachio combination work? Definitely. The biscotti received raving reviews from all who tried it. I even had requests for orders for it for Chinese New Year! I had to explain that it was a Christmas flavour, but on second thought, I guess it is a wonderful biscotti to have all year round.

Cranberry and Pistachio Biscotti

Ingredients:
1 1/2 cup all-purpose flour
1 1/2 tsp baking powder
1/4 tsp salt
1/2 cup yellow cornmeal
4 oz unsalted butter, at room temperature
1 cup sugar
2 large eggs
1  tsp vanilla extract
1/2 cup lightly toasted chopped pistachio nuts
1/2 cup dried cranberries

Method:

  1. Place a rack in the center of the oven and preheat the oven to 350ºF. Line a baking sheet with parchment.
  2. Whisk flour, baking powder and salt together. Add the cornmeal and whisk again.
  3. Using a stand mixer, beat butter and sugar together at medium speed for 3 minutes, until very smooth.
  4. Add eggs and continue to beat, scraping down the sides of the bowl as needed, for another 2 minutes or so, until the mixture is light and creamy.
  5. Beat in the vanilla extract.
  6. Reduce the mixer speed to low and add in the dry ingredients mixture, mixing only until they are just incorporated.
  7. Scrape down the sides of the bowl, add in the chopped pistachios and cranberries and mix just to blend.
  8. Scrape half the dough onto one side of the baking sheet. Using your fingers and a rubber spatula, work the dough into a log about 12 inches long and 1 1/2 inches wide.
  9. Form another log on the other side of the baking sheet.
  10. Bake for 20 minutes, or until the logs are lightly golden but still soft and springy to the touch.
  11. Transfer the baking sheets to a rack and cool the logs on the baking sheet for 30 minutes.
  12. Carefully transfer the logs onto a cutting board and with a serrated knife, trim the ends and cut the logs into 3/4 inch thick slices. Return the slices to the baking sheet, this time standing up.
  13. Bake the biscotti for another 15 minutes, until they are golden brown and firm.
  14. Transfer them to racks and cool to room temperature.

These will keep well at room temperature if stored in an air-tight container.

Christmas gingerbread – hearts and crosses

The true meaning of Christmas is found in Christ and so even though it is not Easter, I thought crosses would be befitting for Christmas too.

Christmas is definitely a season of love – where family and friends get together to spread festive joy and cheer. May we not forget the true meaning of Christmas – love was why He sent His son.

I know it is not Valentine’s Day, but I had red and white icing left over from Santas, so why not? Have a very blessed Christmas.

Christmas gingerbread – santas, hollies, ornaments and presents

Like I said in an earlier post, Christmas is a season where people start baking crazily. I didn’t quite go crazy baking –  it’s just that my gingerbread recipe yields A LOT of gingerbread. So one gets tired of snowflakes and has to think of alternatives. Gingerbread man (and woman) and Christmas trees would be great, if only I had the cutters. That’s right. I only discovered that I did not own any gingerbread or Christmas tree cutters after I’ve made the gingerbread dough. Another reason why one should categorise his/her cutters.

Anyway, I discovered the versatility of the simple circle cutter. A circle cutter and a large piping tip makes good Christmas ornaments. So here are the decorated Christmas ornaments, in a variety of Christmasy colours, individually packed as gifts.

Another use of the mighty circle cutters – Christmas hollies! I tried to pipe these with the leaf tip but perhaps the icing was not quite stiff enough, the vein patterns were not as pronounced. Nevertheless, I think they look cute.

Yet another use for the circle cutters – Santa faces! I got this idea from one of my baking books – Cookie Craft. I think they look absolutely adorable. The children will definitely like them. I was a little lazy to dot the eyes with black dye but if you so fancy, do go ahead.

These are the least of my favourites, but since I had a present cookie cutter, I decided to use them afterall.

Christmas gingerbread – snowflake series

And so it’s that time of the year again, where everyone starts baking crazily. Gingerbread is usually on the baking list, and so are iced cookies. So gingerbread iced cookies it will be. I did a series of snowflakes of different sizes, mostly small ones though simply because they are cuter and easier to manage. I like this particular gingerbread recipe because the cookies don’t rise much, leaving a nice flat surface for decorations. Gingerbread softens very quickly, especially with a layer of icing on top. Big ones become very fragile. The above is the plain design – white lemon icing on gingerbread. I like the effect of the gold dragees on the white icing. Perhaps silver would have been better, but they are always out of stock, Christmas or not.

These ones are made using light turquoise lemon icing. My snowflakes are all either white or light turquoise. Somehow any other colour looks a little weird on snowflakes. Pink snowflakes anyone?

I really like these. These are flooded with icing, left to dry before the details are piped on and coarse sugar is sprinkled on the wet details. I couldn’t get hold of sanding sugar but coarse sugar works perfectly well too. Somehow these give an icy snowy feel. Aren’t they pretty?

I tried a white on turquoise combination too. I think the colour combination works pretty well! A very different feel from the white on white.

And here is the big snowflake. I only made three of these because I couldn’t bear the thought of having to decorate so many big ones. And, like I mentioned they are awfully fragile. The next time, I will make the large snowflakes with regular sugar cookie dough. Those are less fragile.

These are the other two large snowflakes that I made. I think the white on turquoise combination still looks better. Turquoise on white looks a little funny.

So did you make any snowflake cookies this year too?

Oatmeal Raisin Cookies

I didn’t manage to take a decent photo of these cookies when I baked them – the photo that you all see above does not look very appetising but I guarantee you, these are really good chewy cookies.

The slightly modified recipe below is taken from one of my favourite books – Desserts By The Yard. The troublesome part about these cookies is that the raisins (that makes them oh so good) require special preparation. The good part about these cookies is that the dough freezes really well, and can last about a month (or slightly more) in the freezer. When you want to eat freshly baked cookies, you’d just have to take the cookie dough logs out of the freezer, slice them up, bake them and wala! Freshly baked oatmeal raisin cookies, straight from the oven.

Recipe:
(Makes 24 large cookies)

1 1/2 cups plain flour
1 tsp baking soda
7 ounces unsalted butter, softened
3/4 cup sugar
3/4 light brown sugar
1 1/2 tsp grated nutmeg
3/4 tsp ground cinnamon
2 eggs at room temperature
3 cups of rolled oats
1 1/2 cups of fat raisins (see other recipe below)

Method:

  1. Sift together flour and baking soda.
  2. Using a mixer, cream butter until lemony yellow, about 2 minutes. Add the sugar, brown sugar, nutmeg and cinnamon. Continue creaming on high speed for about 2 minutes, until the mixture is smooth and lump-free.
  3. Add eggs one at a time, scraping down the bowl and paddle after each addition. Beat on low for 15 to 30 seconds, until the eggs are fully incorporated.
  4. On low speed, add the sifted flour mixture, beating until all the flour is incorporated. Scrape down the sides of the bowl.
  5. On low speed, mix in the oats and raisins.
  6. With a rubber spatula, scoop out the dough and divide it in half. Centre one half along the bottom of a sheet of baking paper and roll up the paper, creating a log of about 2 inches wide and 12 inches long. Repeat with the other portion of dough.
  7. Refrigerate the logs for a minimum of 1 hour. The logs can be wrapped in cling film and stored for 3 days in the refrigerator or 1 month in the freezer.
  8. Preheat oven to 350 degrees F. Remove dough from parchment when it’s firm and chilled and using a serrated knife, slice 1/2 inch rounds off the log.
  9. Place the cookies on prepared baking sheets, 2 – 3 inches apart.
  10. Bake for 12 minutes, rotate the sheets from front to back and bake for another 5 – 8 minutes, until the cookies are nicely browned.
  11. Remove the parchment from the cookie sheets and allow to cool for 5 minutes before eating. Cool completely before storing.

Recipe for Fat Raisins:
(makes 1 cup)

1 cup golden raisins
1/2 cup dry white wine
2 tbsp freshly squeezed orange juice
1 tbsp dark rum
2 tbsp sugar

Method:

  1. Combine all ingredients in a small heavy saucepan, bring just to boil over medium heat, stirring continually.
  2. Lower the heat so that the liquid is at a bare simmer and poach for 20 minutes.
  3. Remove from heat, cover the pan with cling film, and allow to cool to room temperature
  4. Store in an airtight container in the refrigerator.

The raisins can keep for up to 2 weeks.