Instant Pot Pho Ga (Vietnamese Chicken Pho)

Pho Ga

Hubby and I just returned from Hanoi, Vietnam about a week ago. It was the first time since the kids were born that we had the opportunity to take a solo trip and we thoroughly enjoyed it. One of our highlights was the cooking lessons from Apron Up. I promised them that I’d blog about them so look out for the next blog post on that happening, sometime this week hopefully. Anyway, one of the dishes that we learnt was Pho Bo, or Beef Pho. Both Pho Bo and Pho Ga are popular Vietnamese breakfast dishes, and both involved simmering the soup broth for long hours. Long hours? That seems like a dish to try to re-make with the Instant Pot! And that was just what I tried to do this past weekend – making Pho Ga, or Chicken Pho, with the Instant Pot. I applied some of the techniques that I learnt from making Pho Bo in the making of Pho Ga.

Before I share the recipe, here are some quick tips:

  • This recipe requires the use of either a grill or oven to broil and char the onion and the ginger. I’d suppose it’s possible to omit this step and just attempt to brown the onion and the ginger with the rest of the herbs but the depth of flavour of the broth would be compromised.
  • It is absolutely essential to parboil the chicken bones to remove the scum. This step is the key to yielding a clear broth.

Here’s the simple recipe. Enjoy!

Instant Pot Pho Ga (Vietnamese Chicken Pho)
 
Author:
Cuisine: Vietnamese
Serves: Serves 4
Ingredients
  • 1 whole chicken
  • 1 large red onion, cut in quarters
  • 3-inch piece of ginger
  • 2 star anise
  • 5 cloves
  • 2 tbsp coriander seeds
  • 2 litres of water
  • 1 bunch of coriander/cilantro stems, tied with cooking string (about 6 would suffice)
  • 2 tbsp fish sauce
  • 2 tbsp sugar
  • salt and pepper to taste
  • Pho noodles, rehydrated
  • 1 lime, quartered
  • Beans sprouts, washed and tails removed
  • Coriander leaves
  • Birds eye chilli
Instructions
  1. Remove the chicken breast from the chicken and set aside. Cut the remaining chicken up by separating the thighs, feet, wings and neck.
  2. Broil the onion sections and ginger in the oven till slightly charred. Turn the sections frequently to ensure even browning. The ginger and onion should become slightly soft.
  3. Allow the onion and ginger to cool down slightly before removing the charred portions. Set aside.
  4. Place the chicken parts (except the breast meat) into a large bowl. Pour enough boiling water into the bowl to cover the chicken parts. Allow it to sit for about 5 minutes. Rinse the scum off the chicken parts and set aside.
  5. Set the Instant Pot to saute mode.
  6. Add the star anise, cloves and coriander seeds to the pot and toast the spices till fragrant (5 minutes). Add the spices into a spice bag.
  7. Fill the pot with 2 litres of water.
  8. Add in the spice bag, ginger, onion, coriander stems and chicken parts (except the breast).
  9. Set the Instant Pot to High Pressure, and set the timer for 25 minutes.
  10. When the timer beeps, allow it to release pressure naturally for about 10 minutes, before carefully de-pressurising the pot.
  11. Open the pot and remove the scum, if any, from the surface of the broth. Remove the chicken legs. Shred the meat off the chicken legs and return the bones to the pot.
  12. Add in the chicken breasts, fish sauce and sugar. Set the IP to High Pressure for another 10 minutes.
  13. Rehydrate the pho noodles according to instructions.
  14. When the pot beeps, allow it to release pressure naturally for about 7-10 minutes before carefully depressurising the pot.
  15. Add in salt and pepper to taste. (I added in 1 - 2 tsp of salt)
  16. Remove the chicken breasts and shred the meat. Remove all the other ingredients from the pot.
Assembling the pho bowls
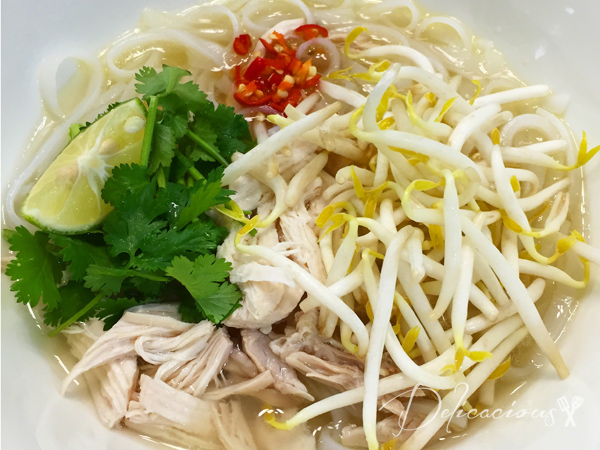
  1. Add some pho noodles to a bowl.
  2. Top the noodles with some bean sprouts.
  3. Ladle the clear broth over the noodles.
  4. Top with shredded chicken meat, cilantro leaves, lime and birds eye chilli, if desired.
  5. Serve hot.


Really Good Banana Muffins

banana muffins

How many recipes does one need for banana muffins? Just one really. A really good one. I’ve tried more than a couple of banana muffin recipes in the past years and this banana muffin recipe is definitely a keeper. There are a few tricks for good banana muffins. Firstly, make sure you use over-ripe bananas. When you have a bunch of bananas that are over-ripe and you don’t feel like baking just yet, peel them and freeze them for use later. Don’t throw them away! Personally, I find that the local variety “red meat bananas” make the best banana muffins/cakes/breads. My grandma calls them “ang bah jio”. Second trick – do not over mash the bananas. This gives the muffins a better texture. Lastly, use brown sugar for a more fragrant muffin.

Really Good Banana Muffins
 
Serves: 12
Ingredients
  • 2 cups plain flour
  • ⅔ cup brown sugar
  • ½ cup toasted coarsely chopped walnuts
  • ½ tsp baking soda
  • ½ tsp salt
  • 4 large ripe bananas
  • 2 eggs
  • 3 oz unsalted butter, melted
  • ¼ cup buttermilk
  • 1 tsp vanilla extract
Instructions
  1. Preheat oven to 180°C. Spray a 12 cup muffin tray with non-stick baking spray and centre an oven rack.
  2. In a large bowl, combine flour, sugar, walnuts, baking soda and salt.
  3. In a separate bowl, coarsely mash the bananas.
  4. Add beaten eggs, butter, buttermilk and vanilla and stir to combine.
  5. Add wet ingredients to the dry ingredients and gently fold (I use a whisk) to combine.
  6. Fill each muffin cup till ¾ full.
  7. Bake for 15-20 minutes, or until muffin tops are golden brown and a tester comes out clean.
  8. Cool to room temperature.

Sun-dried Tomato Pesto

Sun-dried tomato pesto

I love sun-dried tomatoes. They are rich in flavour and can be used in so many ways. I particularly like them in pastas and salads – that distinct taste of sun-dried tomatoes livens up the whole dish! I usually use sun-dried tomatoes that are steeped in olive oil. If you use the dried ones, you will have to reconstitute them in some water. Do not throw away the water though, use it in your pasta!

Continue Reading

Nutella Swirled ChocoNana Muffins

Nutella swirled choco nana muffins

I was mulling over what to bake for breakfast and asked my husband if he preferred oatmeal bread or honey wholewheat bread. “Chocolate Banana bread!” my little one chimes in. Chocolate banana bread? Now where did that come from! She has never tried chocolate banana cake, bread, muffin or anything of that combination. It did sound like a good idea though. After all, I really like chocolate mousse cake with banana slices.

So breakfast was decided. Chocolate banana bread. Only that a loaf of bread sounded a little boring. “How bout chocolate banana muffins instead?” I asked the little one. She nodded in agreement. I never thought that my 2.5 y.o will be deciding the breakfast menu at such a young age!

I set out to bake Chocolate Banana muffins. And then I had a brainwave. My husband loves nutella. How bout topping each muffin with just a little nutella? Brilliant isn’t it? I would think so because the muffins were so good. I love the texture, the flavour, the chunky banana and the bits of chocolate AND the nutella. You would love it too, if you try it!

Nutella Swirled ChocoNana Muffins
 
Author:
Serves: 8
Ingredients
  • 2 cups plain flour
  • ½ cup sugar
  • ½ teaspoon baking soda
  • ½ teaspoon salt
  • 3 ripe bananas, mashed coarsely
  • 2 large eggs, beaten
  • 3 ounces unsalted butter, melted and cooled
  • 1 teaspoon vanilla extract
  • ¼ cup buttermilk
  • ½ cup semi-sweet chocolate chips
  • nutella
Instructions
  1. Preheat oven 175ºC.
  2. Place 8 large standing muffin liners on a baking tray. (You can use a muffin tray as well.)
  3. In a large mixing bowl, combine flour, sugar, baking soda and salt.
  4. In a smaller mixing bowl, add eggs, melted butter, vanilla extract and buttermilk to the mashed bananas. Stir to combine.
  5. Pour wet ingredients into the dry ingredients and fold gently.
  6. Stir in the chocolate chips.
  7. Fill each muffin cup to ¾ full.
  8. Top with ½ tsp of nutella. Swirl with a toothpick or a small spatula.
  9. Bake for 20 minutes, or until a tester comes out clean.

This post is shared at these blogs.

Old Fashioned Cheese Bread and my Bread-making Journey

Old Fashioned Cheese Bread

I received a photo, followed by a voice message while at work today. The voice message was my daughter asking me to make her the bread in the photo – some raisin roll. A second message soon followed with “instructions” from her on how I should make the bread. “Mama, you need to put some flour, then put some blueberries, then put some oil and more flour. Then I can eat it for breakfast.” I think she thought the raisins in the bread were blueberries. Her bread won’t rise for sure – no yeast. 🙂

My bread-making journey has many twists and turns. If you were to ask me to bake bread two years ago, I probably would have cringed. Now, it’s something I do every other day. It wasn’t always easy. The first time I tried to make bread, I used a wooden spoon. I may have overmixed/undermixed or punched the dough too hard because the bread turned out rock hard. And I had aching arms.

Continue Reading

{Closed} Pre-Holidays Giveaway! – Cook’s Illustrated Nov & Dec 2013

cooks illustrated giveaway

October and November is always a period of celebration for the family. Both my husband and my birthdays fall in these months and so does our wedding anniversary! Amid the celebrations, I thought that it’s apt to share some of our joys with you, our readers, with this little giveaway.

Some of you may know that I love cookbooks and food magazines. Cook’s Illustrated is one of them. Although it is not as exciting in terms of photography as some other magazines (it’s black and white), it has a wealth of information from cooking tips, recommendations and recipes that will definitely work. This Nov & December edition has recipes that are perfect for your holiday preparations! Read more about Cook’s Illustrated here.

Continue Reading

Almost healthy blueberry crumb cake

blueberry crumb cake

I am a terrible blogger. I discovered how terrible I was recently when I got myself onto Google+ and found out there was so much more to food blogging than I ever knew. Planning a blog post? You mean people plan blog posts and not just post whenever they fancy. Ah… but the knowledge is good. Now to start becoming more organised.

You see, I seldom plan what to bake/cook these days. It is usually a case of “oh the kid slept early today, now what can I bake?” or “I think these blueberries have been lying around the fridge for a little too long, I should do something about them”. So it happens when those two statements fall on the same night, I bake blueberry crumb cake.

Now read crumb cake and you know that it has a streusel topping. I love streusel topping though it is probably way too sweet for my good and so I usually compensate by reducing the sugar in the cake. This time round, I attempted to ease my conscience by substituting half of the flour with whole wheat flour.

I brought this to work and colleagues loved it. Serve it with coffee or tea if you like. I was happy to eat it on its own.

Almost healthy blueberry crumb cake
 
Ingredients
Streusel topping
  • 2.5 oz unsalted butter, at room temperature
  • ¼ cup caster sugar
  • ¼ cup light brown sugar
  • ⅓ cup whole wheat flour
  • ¼ tsp salt
  • ½ cup chopped walnuts
Cake
  • 2 cups fresh blueberries
  • 1 cup plus 2 tsp plain flour
  • 1 cup whole wheat flour
  • 2 tsp baking powder
  • ½ tsp baking soda
  • ¼ tsp salt
  • ¼ tsp ground cinnamon
  • ½ cup light brown sugar
  • grated zest of 1 lemon
  • 3 oz unsalted butter, at room temperature
  • 2 eggs, at room temperature
  • 1 tsp vanilla extract
  • ½ cup milk
Instructions
  1. Preheat oven to 175°C and place a rack in the centre of the oven.
  2. Spray an 8-inch square baking pan with non-stick spray.
  3. Using a fork, combine the ingredients for the streusel topping (except the walnuts) together.
  4. Stir in the walnuts and keep covered with cling wrap and refrigerated until required.
  5. Toss blueberries with 2 teaspoons of plain flour.
  6. In a large bowl, sift remaining plain flour, whole wheat flour, baking powder, baking soda, cinnamon and salt. Whisk to combine.
  7. In the bowl of a standing mixer, rub sugar and zest together with fingertips until sugar is moist and fragrant.
  8. With the paddle attachment, cream sugar with butter at medium speed till light.
  9. Add eggs one by one, beating for about a minute after each addition.
  10. Beat in the vanilla extract.
  11. Reduce mixer speed to low and add in the flour mixture and milk alternately, starting and ending with the flour mixture.
  12. The batter will be thick. Stir in the blueberries with a rubber spatula.
  13. Pour batter into the prepared pan and smoothen out the top.
  14. Break refrigerated streusel topping into pieces and scatter over the top of the cake.
  15. Bake for about 60 minutes, until the top is golden brown.
  16. Transfer cake to a rack to cool.
  17. Serve warm or at room temperature.
Notes
Recipe adapted from "Baking, from my home to yours"

This post is shared at Foodie Friday at Rattlebridge Farm and Simple Living and Eating and Freedom Fridays.