Chocolate Banana Layered Cake

chocolate banana layered cake

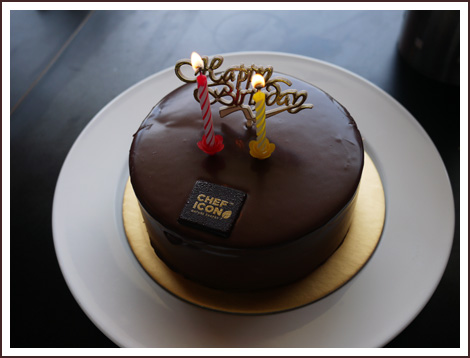
This was my birthday cake. And yes, I baked it myself. For the first time in forever (you can tell that my daughter is still having Disney Frozen fever), I baked myself a birthday cake. It was a spur of the moment decision really. I bake my childrens’ birthday cakes, I bake my husband’s birthday cake, I even bake my friends’ children’s’ birthday cake, why shouldn’t I bake my own birthday cake? My hubby didn’t agree though – he said I deprived him of a chance of buying me a cake. 🙂

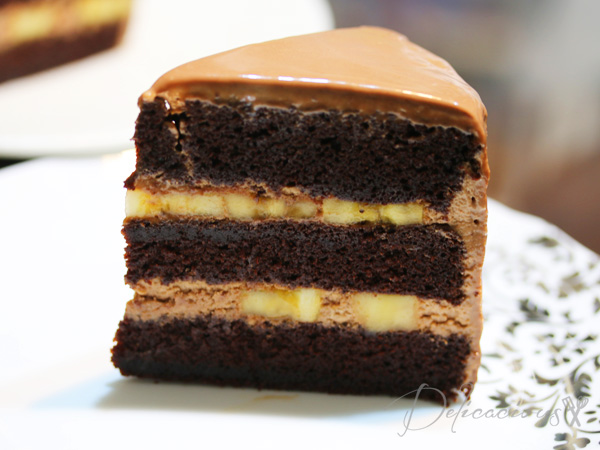
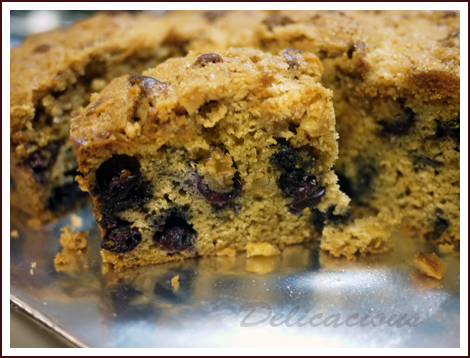
So happy me got to bake TWO birthday cakes for myself. Well, theoretically this is the birthday cake but I had a staff workshop in the morning and baked a simpler chocolate banana cake (the non-layered type) for my colleagues. But let’s talk about this cake instead. I love the Secret Recipe chocolate banana cake. On the rare occasions that I’m there, that’s the cake I always order. Unfortunately, it’s expensive. Well, most cakes are these days. And so when I saw The Baking Biatch’s Chocolate Banana Cake, I decided to try my hand at making the cake. I didn’t end up using her recipe, as I wanted a more chocolatey cake (her sponge cake is a lighter chocolate cake with less cocoa content), but inspiration came from there.

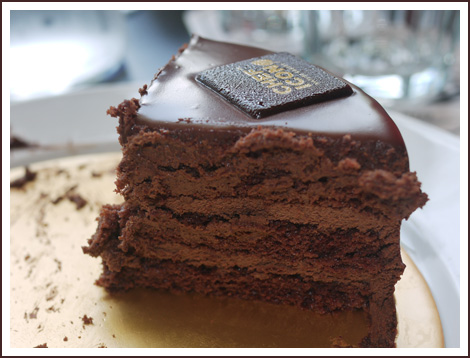
Essentially, I used my favourite Chocolate Devil’s Food cake (recipe modified from Munira’s chocolate devil food cake) as a base, filled the in-between layers with chocolate whipped cream and bananas, and covered the cake with chocolate ganache. I used Valrhona chocolate for this cake (which really made a difference), but you can use your favourite good quality chocolate. For the many who have been asking for the recipe, here goes…

Chocolate Banana Layered Cake
 
Serves: 1 8 inch cake
Ingredients
Chocolate Cake
  • 1 cup cake flour
  • 1 cup plain flour
  • ¾ cup dutch-processed cocoa powder
  • 1 tsp baking powder
  • 2 tsp baking soda
  • 1 tsp salt
  • 1⅓ cup Demerara sugar
  • 2 eggs (room temperature)
  • ¾ cup vegetable oil
  • 1 cup buttermilk (Add 1 tbsp white vinegar and add milk to form 1 cup)
  • 1 cup hot coffee (1 tsp instant coffee granules dissolved in hot water)
  • 1 tsp vanilla extract
Chocolate whipped cream
  • 85g couverture chocolate (dark or milk, your preference)
  • 1 cup whipping cream
Chocolate ganache
  • 120g dark chocolate couverture (I used a mix of milk and dark couverture)
  • 1 cup whipping cream
To assemble
  • Simple sugar syrup (optional)
  • 3-4 large bananas, sliced
Instructions
Chocolate Cake
  1. Preheat oven to 170°C.
  2. Grease and line three 8 inch cake pans (you can use one large one and split the cake up as well)
  3. In a large bowl, sift together the dry ingredients.
  4. In another large bowl, combine the wet ingredients.
  5. Add the wet ingredients to the dry ingredients and using a whisk and starting from the centre, slow combine till you get a smooth batter.
  6. Divide among the cake pans and bake for 20-25 minutes or until a tester inserted in the middle comes out clean.
  7. Turn the cakes out of the pans and cool on racks completely.
  8. Wrap cakes in cling wrap and chill for 30 minutes or more to allow for easier frosting.
Chocolate whipped cream
  1. Melt chocolate in the microwave or in a double boiler. Allow it to cool for 15 minutes or so.
  2. Meanwhile, whisk whipping cream in the bowl of a standing mixer till it forms stiff peaks. (I chill the bowl and the whisk before use)
  3. Add ⅓ of the whipped cream to the melted chocolate to lighten it.
  4. Then pour the chocolate mixture into the remaining whipped cream and fold gently to combine.
Chocolate ganache
  1. In a small pot, heat whipping cream till bubbles form at the side. Do not allow it to boil.
  2. Pour hot whipping cream over chocolate and whisk till chocolate melts.
  3. Allow it to cool slightly and thicken before use.
To assemble
  1. Spray the first layer of cake with sugar syrup (optional)
  2. Spread whipped cream on the cake and top with sliced bananas
  3. Top with more whipped cream and place the second layer of cake above it.
  4. Add whipped cream, bananas and more whipped cream.
  5. Top with the third layer of cake.
  6. Ice the top and sides of the cake with more whipped cream.
  7. Place in the fridge to chill till firm.
  8. While the cake is chilling in the fridge, you can prepare your ganache.
  9. Place chilled cake on a rack.
  10. Pour ganache over the cake and allow it to flow down the sides.
  11. Chill cake till ganache sets.
  12. Slice, serve and enjoy.


Almost healthy blueberry crumb cake

blueberry crumb cake

I am a terrible blogger. I discovered how terrible I was recently when I got myself onto Google+ and found out there was so much more to food blogging than I ever knew. Planning a blog post? You mean people plan blog posts and not just post whenever they fancy. Ah… but the knowledge is good. Now to start becoming more organised.

You see, I seldom plan what to bake/cook these days. It is usually a case of “oh the kid slept early today, now what can I bake?” or “I think these blueberries have been lying around the fridge for a little too long, I should do something about them”. So it happens when those two statements fall on the same night, I bake blueberry crumb cake.

Now read crumb cake and you know that it has a streusel topping. I love streusel topping though it is probably way too sweet for my good and so I usually compensate by reducing the sugar in the cake. This time round, I attempted to ease my conscience by substituting half of the flour with whole wheat flour.

I brought this to work and colleagues loved it. Serve it with coffee or tea if you like. I was happy to eat it on its own.

Almost healthy blueberry crumb cake
 
Ingredients
Streusel topping
  • 2.5 oz unsalted butter, at room temperature
  • ¼ cup caster sugar
  • ¼ cup light brown sugar
  • ⅓ cup whole wheat flour
  • ¼ tsp salt
  • ½ cup chopped walnuts
Cake
  • 2 cups fresh blueberries
  • 1 cup plus 2 tsp plain flour
  • 1 cup whole wheat flour
  • 2 tsp baking powder
  • ½ tsp baking soda
  • ¼ tsp salt
  • ¼ tsp ground cinnamon
  • ½ cup light brown sugar
  • grated zest of 1 lemon
  • 3 oz unsalted butter, at room temperature
  • 2 eggs, at room temperature
  • 1 tsp vanilla extract
  • ½ cup milk
Instructions
  1. Preheat oven to 175°C and place a rack in the centre of the oven.
  2. Spray an 8-inch square baking pan with non-stick spray.
  3. Using a fork, combine the ingredients for the streusel topping (except the walnuts) together.
  4. Stir in the walnuts and keep covered with cling wrap and refrigerated until required.
  5. Toss blueberries with 2 teaspoons of plain flour.
  6. In a large bowl, sift remaining plain flour, whole wheat flour, baking powder, baking soda, cinnamon and salt. Whisk to combine.
  7. In the bowl of a standing mixer, rub sugar and zest together with fingertips until sugar is moist and fragrant.
  8. With the paddle attachment, cream sugar with butter at medium speed till light.
  9. Add eggs one by one, beating for about a minute after each addition.
  10. Beat in the vanilla extract.
  11. Reduce mixer speed to low and add in the flour mixture and milk alternately, starting and ending with the flour mixture.
  12. The batter will be thick. Stir in the blueberries with a rubber spatula.
  13. Pour batter into the prepared pan and smoothen out the top.
  14. Break refrigerated streusel topping into pieces and scatter over the top of the cake.
  15. Bake for about 60 minutes, until the top is golden brown.
  16. Transfer cake to a rack to cool.
  17. Serve warm or at room temperature.
Notes
Recipe adapted from "Baking, from my home to yours"

This post is shared at Foodie Friday at Rattlebridge Farm and Simple Living and Eating and Freedom Fridays.

Apple walnut bundt cake

apple bundt 1

Not so long ago there was this fruit sale at my office (yeah, to encourage us to eat healthy). My friend was in-charge of the sale and she was asking me to buy the apples. So I told her jokingly, “Buy them for me and I will bake you something.” WRONG MOVE. An hour later, I had 5 apples sitting on my table and I had to make good my word. I went home and lo and behold, my mom had bought another 4 apples. So I had 9 apples, and I better make something with it, fast.

So I flipped through my books for a simple recipe of something that required a lot of apples. I didn’t want to make a tart because it seemed like too much work for a late night baking session. When I came across this apple cake recipe that required 6 apples, I knew it was the one.

apple bundt 2

Enters apple bundt cake. The original recipe called for the cake to be baked in a tube pan. I didn’t have a tube pan, but I have several bundt pans and figured that they would do the job too. Bundt pans typically do an excellent job in getting the cake evenly baked while keeping it moist. Sounds like the perfect pan to use for this cake. I also like bundt cakes because they typically feed a crowd, and are so easy to cut up and serve (just follow the markings on the cake and you have a perfectly divided cake). They also look pretty and the cake hardly needs any decoration, though a dusting of powdered sugar would perhaps complete the look.

The cake was every bit what it promised to be – fully apple-ly and fully cake. Apples and cinnamon. Add walnuts and you will never go wrong. The walnuts add texture to the already flavourful cake and the bundt pan kept the cake oh so moist. Colleagues raved about it and I am sure you would too, if you try it.

Apple bundt cake
 
An excellent apple bundt cake that's filled with apples, accentuated with walnuts and the flavour of cinnamon.
Recipe type: Cake
Serves: 12-16
Ingredients
  • 6 apples, peeled and cut into ½ inch chunks
  • 1 tbsp ground cinnamon
  • 1½ cup plus 5 tbsp sugar
  • 2¾ cups plain flour
  • 1 tbsp baking powder
  • 1 tsp salt
  • 1 cup canola/vegetable oil
  • ¼ cup orange juice
  • 2½ tsp vanilla extract
  • 4 eggs
  • 1 cup walnuts, chopped
Instructions
  1. Preheat oven to 175°C.
  2. Butter and flour a 10-12 cup large bundt pan or use non-stick spray.
  3. Toss chopped apples with 5 tbsp sugar and cinnamon. Set aside.
  4. Sift the flour, baking powder and salt together in a large bowl.
  5. In a standing mixer fitted with the paddle attachment, combine oil, orange juice, remaining sugar, vanilla extract and eggs.
  6. Add in flour mixture in 2 parts with mixer on low. Scrape bowl to ensure even incorporation. Stir in walnuts.
  7. Pour half of the batter into the pan. Spread half the apple chunks.
  8. Top up pan with remaining batter and spread evenly.
  9. Arrange remaining apple on top.
  10. Bake for 1½ hours, or until a tester comes out clean.
  11. Allow to cool completely in pan before turning it out onto a serving plate.
Notes
Recipe is adapted from The Smitten Kitchen Cookbook

Red wine chocolate cake with mascarpone cream

redwinecake2 I posted some time earlier about a red wine chocolate bundt cake that received rave reviews from my friends. So when I had half a bottle of unfinished red wine, I thought about baking that cake again. While surfing though, I came across a recipe on smitten kitchen that looked simpler and really good. So I tried that instead and tested it on my colleagues.

The texture of the cake is a cross between a brownie and a cake. It is dense but moist and boy was it rich. Deb from smitten kitchen calls it the real velvet cake and I think she is right. The cake is baked at a fairly low temperature of 160°C and so the alcohol does not boil off much. The red wine flavour comes through really strongly so my advice would be to use a fairly good bottle of red wine. I used a merlot for this cake, but you can use pretty much any kind you like. The mascarpone cream topping is a must. Do not omit that!

Red wine chocolate cake with mascarpone cream

Website adapted from smitten kitchen

Ingredients

cake

  • 3oz unsalted butter (at room temperature)
  • 2/3 cups brown sugar
  • 1/4 cup caster sugar
  • 1 egg + 1 yolk
  • 3/4 cups red wine
  • 1 teaspoon vanilla extract
  • 1 Cup + 1 Tablespoon plain flour
  • 1/2 cup Dutch processed cocoa powder
  • 1/2 teaspoon baking powder
  • 1/8 teaspoon baking soda
  • 1/4 teaspoon salt
  • 1/4 teaspoon ground cinnamon

mascarpone cream

  • 1/2 cup mascarpone cheese
  • 1/2 cup chilled whipping cream
  • 2 tablespoons caster sugar
  • 1/2 teaspoon vanilla extract

Directions

Step 1
Preheat oven to 160°C. Line a 9 inch round cake pan and spray the interior with a non-stick spray.
Step 2
Using a standing or a handheld mixer, cream butter until smooth then add the sugars and beat till light and fluffy.
Step 3
Add the egg and yolk, then the red wine and the vanilla and beat after each addition. The batter will look lumpy.
Step 4
In a separate large bowl, sift together flour, cocoa powder, baking powder, baking soda, salt and cinnamon.
Step 5
Sift the ingredients over the wet ingredients and combine on low speed. Fold in the last bits with a rubber spatula. Do not overmix!
Step 6
Bake for 25 minutes on the centre rack of the oven. The tester should come out clean. Do not overbake or the cake will be dry.
Step 7
Cool for 5-10 minutes in the tin then turn it out onto a rack and cool till it comes to room temperature. Dust with icing sugar if you like.
Step 8
Whip together mascarpone cheese, whipping cream, sugar and vanilla extract till soft peaks form. (Cream can be refrigerated for a couple of hours)
Step 9
Serve each slice of cake with a large dollop of cream.

Chef Icon Bakery

Chocolate Trovana I stumbled upon this bakery through an advertisement I saw on facebook. Chef Icon Bakery prides itself in being a nature bakery – they use no artificial ingredients or artificial fats. Seems like a perfect place to shop for a birthday cake for my daughter.

I went there in the afternoon with my husband to shop for a birthday cake and was promptly recommended their signature Chocolate Trovana. The signature cake comes in sizes of 500g, 1kg and 2kg and prior ordering is required. Looking at the array of cakes, we decided to stop for tea too.

Chef Francis was very friendly and recommended that we tried one of his cheesecakes if we liked cheesecakes. He promised that his cheesecakes were very different, and different they were. Even the cookies for the oreo cheesecake base were baked in the shop. His reason? Commercial oreo cookies contained preservatives. Such dedication to his nature baking concept indeed!

We finally decided to try the mango cheesecake and we were definitely not disappointed. The cheesecake was very light, unlike other baked cheesecakes that I’ve tried. Despite it’s lightness, the cake definitely did not lose its flavour. The mango fragrance permeated the cake; every bite was a delight. We were so busy eating the cake that we forgot to take a nice photo of it! Alas, there’s always a chance for visit two.

Now, back to the Chocolate Trovana cake we ordered. The verdict is found below.

chef_icon2 The layers of chocolate mousse and chocolate cake together with the rich chocolate ganache formed a heavenly combination. The cake was velvety smooth and very rich in chocolate flavour. Thankful that I only bought the 500g cake as a small slice goes a long way. This cake is highly recommended. Possibly the best chocolate cake I’ve tasted in a long while.

So where can you find Chef Icon?

Chef Icon Bakery
5 Kampong Bahru Rd
Singapore 169341
Phone: +65 9337 3900Mon – Sat: 8am to 8pm

Brown Velvet Rose Cakes

velvetcake2

My rose bundt pan finally arrived in the mail and I simply had to make something with it. Since I had leftover buttermilk, I decided to try making red velvet cakes. Yes, RED velvet cakes. How did they end up brown then? Simply when you don’t add enough red food colouring, which was what happened. Sigh, the problem with gel food colourings and liquid food colourings is that you don’t quite know how much to substitute each for when the recipe calls for one or the other. Estimation does not always yield the best results. Oh well, the next time I try this again, I would know better.

I decided to do a slight twist to the basic red velvet recipe by adding coffee extract, since coffee typically complements chocolate. I think it tastes pretty good, but I will definitely up the amount of coffee extract the next time I redo this. The adapted recipe below shows my recommended dose of coffee extract.

velvetcake

So how does red velvet taste like? It is not overwhelmingly chocolaty but the texture is fantastic – moist and dense. People typically serve this with a cream cheese topping but I was lazy and decided to serve it plain. My friends did not complain so I guess it’s good enough to be eaten on its own too.

Brown Velvet Rose Cakes
 
Brown velvet rose cakes are the result of a traditional red velvet cake made without the red colouring. It tastes every bit as good though!
Author:
Recipe type: Cake
Serves: 16
Ingredients
  • 1¼ cup canola oil
  • 1 cup buttermilk
  • 2 eggs at room temperature
  • 2 tbsp liquid food colouring
  • 1 tsp white wine vinegar
  • 1 tsp vanilla extract
  • 2 tbsp coffee extract
  • 2½ cup all-purpose flour
  • 1¼ cup sugar
  • 1 tsp baking soda
  • ¾ tsp fine salt
  • 1 tbsp cocoa powder
Instructions
  1. Preheat oven to 350ºF with a rack centered in the middle.
  2. Using a standing mixer, combine oil, buttermilk, eggs, food colouring, vinegar, vanilla and coffee extract. Beat on medium speed for 1 minute.
  3. In a medium bowl sift together flour, baking soda, salt, cocoa powder and sugar.
  4. With the mixer on low, add dry ingredients to the batter ½ cup at a time. Add slowly so that the mixture does not form lumps.
  5. Lightly grease the pan and pour batter into each cavity till they are ⅔ full.
  6. Bake until inserted toothpick comes out clean, about 20 minutes.
  7. If frosting, cool completely first.


Cranberry Shortbread Cake

I made this for a dinner party on Christmas eve, but I think it works well as an everyday cake. The cake has three distinct textures – First, you bite into the crunchy and sugary shortbread. Next, your teeth sinks into the moist jam layer before finishing at the cake layer at the bottom. The tartness of the cranberry jam perfectly balances the sugary crust of the shortbread. I served this with vanilla ice cream but it’s perfect on its own too.

Cranberry Shortbread Cake
Serves 8 to 10
Adapted from Baking from my home to yours

Ingredients for cranberry jam:
1 large orange
1/4 cup orange juice
12 ounces fresh or frozen cranberries
3/4 cup sugar

Method:

  1. Grate the zest of one orange into a medium heavy-bottomed saucepan.
  2. Remove the peel and pith and segment the orange between membranes. Add the orange segments into the saucepan.
  3. Reserve the juice from the orange. If it does not form 1/4 cup, top up with more orange juice.
  4. Put the cranberries and sugar into the pan and bring to a boil over medium heat, stirring frequently.
  5. Continue stirring for 5 – 8 minutes, until the cranberries pop and your spoon leaves tracks.
  6. Scrape the jam into a bowl and cool to room temperature.

Ingredients for the cake:
2 1/2 cups all-purpose flour
1 tsp baking powder
Pinch of salt
6.5 oz unsalted butter, room temperature
1 cup sugar
1 large egg
1 egg yolk
1 tsp vanilla extract
2 tsp sugar (for dusting)

Method:

  1. Mix together flour, baking powder and salt.
  2. Using a standing mixer with a paddle attachment, beat the butter on medium speed till soft and smooth.
  3. Add sugar and continue beating till it is well-combined.
  4. Reduce the mixer speed to low and add in the egg and yolk, beating until they are well incorporated.
  5. Beat in the vanilla extract.
  6. Add in the flour mixture in two parts, mixing only until it is just incorporated. Do not overmix.
  7. Turn the dough out onto a work surface and divide it into half. Pat each into a disk and wrap the disks up in plastic.
  8. Refrigerate each disk for 15 to 30 minutes (or refrigerate it overnight and thaw it for 20 minutes the next day before using).
  9. Preheat the oven to 350ºF while dough is chilling.
  10. Butter a non-stick 9-inch springform pan and place it on a baking sheet lined with parchment.
  11. Roll out one disk to the size of the springform and press it lightly into the pan.
  12. Spread the cranberry jam evenly over the dough.
  13. Roll the second piece of dough to the size of the pan and carefully invert it onto the filling.
  14. Brush the top lightly with water and sprinkle with 2 tsp of sugar.
  15. Bake for 40 minutes, until the top of the cake is golden brown.
  16. Transfer onto a cooling rack to cool for 20 minutes in the pan, before removing the sides and allowing it to cool to room temperature.
  17. Serve at room temperature.