Roast chicken with gremolata butter

chicken gremolataI’ve a weakness for recipe books with beautiful, mouthwatering pictures. Better yet if the book has an interesting layout. Written by a well-known chef that I like? I am sold. Even if the recipes seem too complicated to reproduce. Result of that? I’ve many cookbooks with recipes that I’ve never tried. Perhaps I’m not the only one guilty of that. Any readers who do that too? 🙂

Anyhow, Thomas Keller is one of those chefs that I like. I like the way his recipe books and I own a few of them though most of them fall into the category of “cookbooks with recipes I’ve never tried”. So when “Ad hoc at home” was published, I decided that it was a good book to buy. Afterall, it depicts the recipes that can be reproduced at home, yes? Alas, I bought the book and it disappeared into the shelf of cookbooks, and the months past.

So one fateful afternoon, not too long ago, I finally decided to dig out the book and try something from it. My eyes fell onto a recipe for roast cornish hens. Well, I didn’t have cornish hens, but I did have a chicken sitting in the fridge and so I decided to adapt the recipe for it.

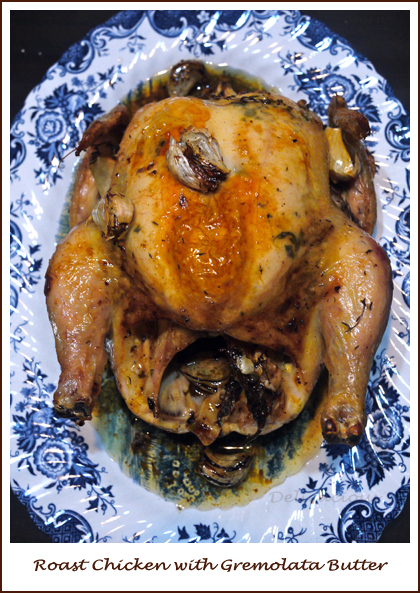
The result is a beautifully roasted bird, as seen in the photo above. Moist, tender, succulent and full of flavour, thanks to the gremolata butter. Absolutely lovely and my family raved about it. The gremolata butter can also be used for other meats or fishes. Try it! I’m sure you will love it as much as I did.

Roast chicken with gremolata butter

Ingredients

  • sea salt and ground black pepper
  • canola oil
  • 6 cloves garlic
  • 1 sprig thyme

Chicken

  • 1 - 1.5kg Whole chicken

Gremolata butter

  • 1/4 teaspoon black peppercorns (whole)
  • zest of 1 lemon
  • 1 garlic clove (grated)
  • 2oz unsalted butter (at room temperature)
  • w teaspoon lemon juice
  • 2 teaspoons flat-leaf parsley (finely chopped)
  • 1/4 teaspoon sea salt

Directions

Step 1
Remove chicken from refrigerator and set aside while you make the butter.
Step 2
Using a pestle, grind peppercorns in a mortar. Add lemon zest and garlic and mash to a paste.
Step 3
Put butter in a medium bowl and mix in pepper mixture, followed by lemon juice. Stir in parsley and salt.
Step 4
Clean chicken and dry well with towels. Leave fat or skin at neck attached and trim off any excess fat.
Step 5
Starting at the cavity end of the chicken, carefully run your fingers between the skin and flesh of the breast and then the thighs to loosen the skin. Spread the butter mixture evenly under the skin of the bird, covering the thighs and the breast.
Step 6
Let the chicken come to room temperature (about 30 minutes). Meanwhile, preheat oven to 220°C.
Step 7
Brush the chicken with canola oil and season with salt. Place chicken on its back in a roasting pan. Scatter garlic and thyme evenly around it.
Step 8
Roast chicken for about 35 - 45 minutes, or until golden brown and temperature registers 70°C in the meatiest portions of the chicken - the thighs and under the breast where the thigh meats the breast.
Step 9
Transfer chicken to a cooling rack and allow it to cook for 15 minutes. Serve the chicken in quarters, arranged on a serving platter and garnish with garlic and thyme.

Braised Pork Belly

tau yew bakAlas, after multiple attempts to post the recipe, this post is finally successful. It must be some bug in the recipe widget that does not like pork belly! Anyhow, this is one of my comfort foods – salty, fragrant, garlicky, fatty goodness. I cut down the fatty portion by not eating the layers of fat, and only eating the meat. My husband chastised me on this every so often. He declares that the fatty portion of the braised pork belly is the best portion! I’m sure many readers will agree.

Whether or not you eat the fatty part of the pork belly, this recipe is sure to please. My toddler loves the egg and tau kwa that goes into this! The pork belly is soft and tender, as a result of the braising process. Absolutely delicious. If you wish to reduce the calorie intake of this dish, replace the pork belly with pork shoulder. For non-pork eating friends, you can replace the pork belly with chicken too!

As I am typing, this dish is cooking in the kitchen. My mom’s version though, not mine. My mom adds chilli to this dish to add some heat and more star anise and cloves than I like. She sometimes uses the packet ingredients for Tau Yew Bak too. I’m partial to my version though. Try it and let me know!

Tau Yew Bak

Serves 6-8
Prep time 30 minutes
Cook time 1 hour, 15 minutes
Total time 1 hour, 45 minutes
Meal type Lunch, Main Dish
Misc Serve Hot
Region Chinese

Ingredients

  • 600g Pork Belly (Sliced)
  • 8 Dried Chinese mushrooms (Soaked and stalks removed)
  • 5 cloves Garlic (Lightly pounded)
  • 1 piece Tau Kwa (firm tofu) (Cut into large cubes)
  • 10 small tofu puffs (Tau Pok)
  • 6 hard boiled eggs (Peeled)
  • 3 tablespoons dark soya sauce
  • 3 tablespoons light soya sauce
  • 1/2 teaspoon ground white pepper
  • 1 teaspoon sugar
  • 2 star anise
  • 6 cloves
  • 1 stick cinnamon
  • 800ml water

Directions

Step 1
Season pork belly with 1 tbsp of dark soya and light soya sauce. Leave meat to marinate for 30 minutes.
Step 2
In a large claypot or casserole, lightly brown pork belly. (No oil is needed)
Step 3
Add garlic and mushrooms and stir to combine. Cook for 3 minutes.
Step 4
Add tau kwa, remaining dark and light soya sauces, sugar and pepper. Mix well and allow to cook for another 5 minutes.
Step 5
Add in star anise, cloves, cinnamon and water and bring to a boil.
Step 6
Allow to boil for 5 minutes then add tau pok and reduce to a simmer for 20 minutes.
Step 7
Add hard boiled eggs and simmer for another 40 minutes or until meat is tender.
Step 8
Serve hot with rice.

Taipei Ding Tai Fung versus Kao Chi (part 1)

The hotel I stayed at is within walking distance of the original Ding Tai Fung and so we decided to visit it during lunch. We were warned by our hotel’s receptionists to go early as crowds were expected but silly us did not heed the warning. We thought, no biggie, we may end up waiting for 30 minutes at most? Wrong.

The entrance of DTF was crowded with sooo many people! The wait would take at least an hour. We made a decision in a split second and decided to try out the hotel’s other recommendation – Kao Chi, located just round the corner from Ding Tai Fung.

Compared to DTF, the 3 storey Kao Chi was quiet, though not unpopular. The tables were well spaced out and the servers were attentive, helpful and very courteous. Kao Chi means “high class” literally, and the service does give one that feeling! The menu is similar to DTF’s and we decided to try some of their popular dishes.

First up, we ordered a double boiled chicken soup with noodles for the little one. The soup is clear and very flavourful. Though I would have preferred the soup to be a tat bit less salty, my daughter seemed to like it as it is.

These fried pork buns are their specialty. The steamed pork buns are fried in a cast iron plate to obtain crispy bottoms and sides. The pork buns are therefore crispy on the outside but juicy on the inside. Ooh delicious!

These crab roe xiao long baos are also their specialty. I like it that the xiao long baos are not overly salty and I can enjoy the natural sweetness and flavour of the crab roe mingled with the fresh and juicy pork filling. Definitely a must try.

Other than Shanghai Dim Sum, Kao Chi also offers a small selection of Hong Kong Dim Sum such as their popular Har Gao or prawn dumpling. The prawns are fresh and succulent and the skin of the dumpling was made to perfection. If you are a fan of Har Gao, Kao Chi’s ones are worth a try.

We ordered the salted yolk cream buns (Liu Sha Bao). I tried to take photo of the filling but it turned out bad and so I am not posting it! The texture of the bao is rather interesting. It is slightly cake like and tastes very refined. Most Liu Sha Baos I have tried are rather salty because of the salted egg but this one is not. It is more creamy than salty.

Verdict of Kao Chi? Food is good, ingredients are fresh, and service is excellent. I especially like that the food is not salty (some may feel it is bland) such that I can taste the natural flavours of the ingredients. Check out the upcoming post to see my opinions of the original Ding Tai Fung.

American Pancakes

Pancakes make a simple yet satisfying breakfast and I make it quite often. I like to explore various pancake recipes, and although I like whole grain pancakes (using whole wheat flour only), my daughter is not a fan. This recipe is tweaked from one that I found online to include wheat bran. Feel free to replace it with more flour if you do not have wheat bran.

I found these pancakes fluffy with a nice slightly cakey texture. My daughter quite enjoyed it! I say quite because she has been very fussy with food lately – blame it on the teething.

Try this recipe and let me know what you think!

American Pancakes

Serves 2
Prep time 15 minutes
Cook time 15 minutes
Total time 30 minutes
Allergy Egg, Milk, Wheat
Meal type Breakfast
Misc Child Friendly, Freezable
Website BBC Food recipes

Ingredients

  • 100g plain flour
  • 30g wheat bran
  • 1 1/4 tablespoon baking powder
  • 1/2 teaspoon salt
  • 2 tablespoons sugar
  • 130ml milk
  • 1 egg
  • 2 tablespoons melted butter, cooled

Directions

Step 1
Sift dry ingredients (flour, bran, salt, sugar, baking powder) into a large bowl.
Step 2
In a separate bowl, whisk eggs, milk and melted butter together.
Step 3
Add wet ingredients to dry ingredients and whisk to obtain a smooth batter. Let batter stand for 3 - 5 minutes.
Step 4
Heat a non-stick pan and add a small knob of butter (or olive oil if you prefer).
Step 5
Add approximately half a cup of batter, and allow it to bubble and rise. Turn it over and cook till the other side is golden brown as well.
Step 6
Serve with butter and maple syrup.

Baked fish with potatoes and gremolata

25th Nov was Cook For Family Day, an event that I had the privilege of organising following a Cook For Family initiative started off earlier by Daniel of Daniel Food Diary.

For Cook For Family Day, I decided to try out a recipe that I saw in an earlier issue of Delicious magazine that I borrowed from my sister-in-law. It is simple and fuss free, as with most one-pot oven meals. Toss everything in and walla! A tasty meal awaits you and your family. If you have a larger family, simply increase the amounts of the recipe below accordingly. Like some spice, add some red chilli slices during the final baking step!

My family and I enjoyed the fish and vegetables very much. The baked fish was moist and tender and the gremolata added alot of flavour. Do not omit it!

Try out this simple recipe when you have the time. It is definitely worth it.

Baked fish with potatoes and gremolata

Serves 4
Prep time 20 minutes
Cook time 45 minutes
Total time 1 hours, 5 minutes
Allergy Fish
Meal type Main Dish
Misc Child Friendly, Serve Hot
From magazine Delicious

Ingredients

Baked Fish

  • 500g Potato (peeled and thinly sliced)
  • 1 onion (thinly sliced)
  • 2 tablespoons olive oil
  • 20g unsalted butter
  • 250g Cherry Tomatoes
  • 100g breadcrumbs
  • 700g Halibut fillets (3 - 4 pieces, depending on size)
  • 1 lemon

Gremolata

  • 1/4 cup Extra virgin olive oil
  • 2 cloves Garlic (finely chopped)
  • 1 Lemon's zest (Grated)
  • 1 bunch English parsley (finely chopped)

Directions

Step 1
Preheat oven to 180°C.
Step 2
Spread potatoes and onions in a large roasting pan and drizzle with 1 tbsp of olive oil. Season with salt and ground pepper, then toss to coat.
Step 3
Spread it out to cover the base of the pan and dot with butter. Bake for 15 minutes.
Step 4
Add tomatoes, and return to the oven for 10 - 15 more minutes.
Step 5
Meanwhile, mix breadcrumbs with remaining 1 tbsp of olive oil and season with salt and ground pepper. Season the fish fillets with salt and pepper as well.
Step 6
Remove roasting pan from oven and place fish over potatoes. Cover with breadcrumbs and lemon slices and return to the oven for 12 - 15 more minutes.
Step 7
In a small bowl, combine extra virgin olive oil, garlic, parsley and lemon zest. Season to taste with salt and pepper.
Step 8
When fish is ready, remove from oven. Serve hot with gremolata.

First ever Cooking Class!

In a bid to share my love for cooking and baking with others, I conducted a cooking class with 9 friends a few weeks ago. It was a hands-on class held in the comfort of my house. I taught four dishes – mushroom soup, ratatouille, chicken cacciatora over mash and apple crumble.

The first picture shows some of the ingredients we used to prepare the dishes. Participants were taught the trick of cutting capsicums and onions with ease!

Here’s ratatouille cooking in a pot! It looks like alot of vegetables but they will soon give off their water and shrink to half the volume. What is ratatouille? It is a vegetarian dish that consists of a few main vegetables – onions, zucchini, red peppers and courgettes. Some add mushrooms as well. The most important part of the dish? Olive oil! You cannot do without it, so do not try to substitute with other vegetable oils!

Many of the participants were intrigued by this equipment. It is an… Immersion Blender! A very useful tool in the kitchen I must say. No more the hassle of pouring mixtures out into a standing blender and having to clean up afterwards! You just need to clean up the bottom part of the immersion blender and you are done! Fast, efficient and clean. I love it and strongly recommend you considering one for your kitchen! I use it to puree my mushroom soups, or just about anything else that needs pureeing. I used it to puree my baby’s food when she was young too!

Here’s one of the partipants preparing the mash potatoes. The trick to fluffy mash potatoes is to ensure that your potatoes are quite dry before mashing them, adding hot milk/cream and to beat and beat until your hands ache!

Dessert is always a joy to prepare, even before the mains are done! Here are the participants working together to prepare the apple crumble which was made with granny smith apples. If you prefer a less tart crumble, use Golden Delicious apples instead.

The completed ratatouille in the pot. See how the amount has shrunk once the vegetables release their liquids?

Mushroom soup! Some like it thick, some like it thin. Have it your way! The participants liked it thicker and so we added less milk. If you prefer it thin, add more milk/stock!

Chicken cacciatora in the pot! It looks a little messy here but I guarantee you it was yummylicious!

Completed apple crumble with a lovely golden oat crust. I love my apple crumble served with good quality vanilla ice-cream. Some like it plain. Your choice!

Everyone had fun! Do you like cooking too? Come join the CookForFamily initative at www.facebook.com/CookForFamily and join the Cooking event happening next Sunday! You can assess the Cook For Family Day event here!

Princess Cupcakes

These pretty princess cupcakes were the request of a friend’s four year old daughter. The colours chosen for this theme was violet and pink – the little girl’s favourite. I decided to use purple as a base for the cupcakes and pink for the fondant hearts. Since the barbie princess stand (provided by my friend) was already fanciful, the other decorations were simple flowers ad a crown.

As always, I start off with the fondant decorations 2 – 3 days before the event to allow them sufficient time to dry out. The trick to get nice fondant letter cut-outs is to allow the fondant to dry a little after rolling it out before cutting it into shapes.

Cupcakes were freshly baked on the day of the party and frosted with violet italian meringue buttercream. I love IMB because it is a perfect blend of sweetness, richness and silky texture. Absolutely delicious. Little sugar pearls were added to accentuate the theme.

The result? A happy little girl and happy guests!