Claypot Chicken Rice

claypot chicken rice | Delicacious

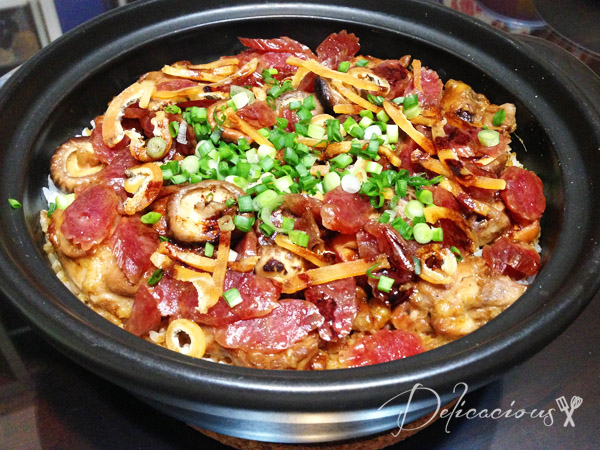
Dinner at home is typically 三菜一汤 (three dishes and one soup) on weekdays but lately, with the addition of an infant, we have been trying to simplify dinner. One dish meals seem to be the way to go and this claypot chicken rice is one of our favourite Chinese one dish meals. It uses simple ingredients, is fast to prepare (start to finish is just slightly more than an hour) and is definitely satisfying. Of course, it can’t beat claypot rice that is cooked over charcoal fire but this definitely comes close. My hubby loves scraping up the slightly charred crispy rice bits at the bottom of the claypot!

Here are some tips for preparing claypot chicken rice. Firstly, cooking times with a claypot would vary with the size of claypot and the fire used. I’ve given guidelines that work for my claypot in my recipe but you may wish to adjust the timing after you’ve tried the recipe for the first time. For the claypot, I’ve used a Tanyu flat bottom claypot, but you can use any seasoned claypot. Noobcook has some good advice on preparing a claypot for its first use here. I’ve adjusted the liquid amount for this recipe so that the rice is moist but not soggy. If you prefer the rice to be drier, you may wish to reduce the liquid amount further. Lastly, whenever possible, use a low sodium chicken stock. If using chicken stock cubes/packaged chicken stock, it would be advisable to use half water and half stock as the stock is usually rather salty.

And now for the recipe…Continue Reading

Bacon and Chicken Alfredo Pasta

Bacon and Chicken Alfredo Pasta

Chicken alfredo pasta is a staple that one sees at almost all pasta joints. If you walk along the pasta aisle in a supermarket, I can almost guarantee that you will find a bottle of ready-to-go alfredo sauce. In fact, many bottles of it, and different brands of it. It is THAT popular. I distinctively remember the day my mom bought a bottle of alfredo sauce and prepared pasta with it. I was young; my mom was working and didn’t have much time for meal preparations. Ready-made sauces were the best bet right? Wrong…. The sauce was floury, gloopy and tasted really bad. Now, I’m sure there are better tasting alfredo sauces out there now, but that experience was enough to stop me from ever, ever, ever buying a bottle of alfredo sauce. Why would I want to do it anyway when preparing alfredo sauce is so simple and quick?

Bacon chicken alfredo

Continue Reading

Tangy Lemon Chicken Pasta

Tangy Lemon Chicken Pasta | Delicacious.com

Ain’t I back to be back blogging again after a week long hiatus thanks to a bout of sickness in the family. Have I mentioned before that I hate the flu bug? If not, I will say it again. I HATE THE FLU BUG. This time round, my poor little girl was down with 6 days of high fever, cough, no appetite and yeah, you get the picture. Unfortunately, I succumbed too. Well, at least both my girl and I could sulk in bed together.

Well, most people know that a good dose of Vitamin C helps to boost immunity. Tangy foods tend to whet the appetite. You know where this is heading? That’s right. Lemons. I love lemons – they are perfect in cupcakes, muffins, salad dressings and even savory dishes. Like this Tangy Lemon Chicken Pasta. It’s quick, fuss-free, delicious and adds a boost of vitamin C to your diet. Sounds good doesn’t it?Continue Reading

Soy Sauce Chicken

soya sauce chicken

Soy sauce chicken is one of those comforting childhood dishes that I love. I love how it is so simple to prepare and requires no complicated or expensive ingredients. It is tasty, the gravy goes well with rice and it feeds the family. What else to ask for? If you prefer, throw in a couple of hard boiled eggs and it can be a one-dish meal when served with rice.Continue Reading

Roast chicken with gremolata butter

chicken gremolata I’ve a weakness for recipe books with beautiful, mouthwatering pictures. Better yet if the book has an interesting layout. Written by a well-known chef that I like? I am sold. Even if the recipes seem too complicated to reproduce. Result of that? I’ve many cookbooks with recipes that I’ve never tried. Perhaps I’m not the only one guilty of that. Any readers who do that too? 🙂

Anyhow, Thomas Keller is one of those chefs that I like. I like the way his recipe books and I own a few of them though most of them fall into the category of “cookbooks with recipes I’ve never tried”. So when “Ad hoc at home” was published, I decided that it was a good book to buy. Afterall, it depicts the recipes that can be reproduced at home, yes? Alas, I bought the book and it disappeared into the shelf of cookbooks, and the months past.

So one fateful afternoon, not too long ago, I finally decided to dig out the book and try something from it. My eyes fell onto a recipe for roast cornish hens. Well, I didn’t have cornish hens, but I did have a chicken sitting in the fridge and so I decided to adapt the recipe for it.

The result is a beautifully roasted bird, as seen in the photo above. Moist, tender, succulent and full of flavour, thanks to the gremolata butter. Absolutely lovely and my family raved about it. The gremolata butter can also be used for other meats or fishes. Try it! I’m sure you will love it as much as I did.

Roast chicken with gremolata butter

Ingredients

  • sea salt and ground black pepper
  • canola oil
  • 6 cloves garlic
  • 1 sprig thyme

Chicken

  • 1 - 1.5kg Whole chicken

Gremolata butter

  • 1/4 teaspoon black peppercorns (whole)
  • zest of 1 lemon
  • 1 garlic clove (grated)
  • 2oz unsalted butter (at room temperature)
  • w teaspoon lemon juice
  • 2 teaspoons flat-leaf parsley (finely chopped)
  • 1/4 teaspoon sea salt

Directions

Step 1
Remove chicken from refrigerator and set aside while you make the butter.
Step 2
Using a pestle, grind peppercorns in a mortar. Add lemon zest and garlic and mash to a paste.
Step 3
Put butter in a medium bowl and mix in pepper mixture, followed by lemon juice. Stir in parsley and salt.
Step 4
Clean chicken and dry well with towels. Leave fat or skin at neck attached and trim off any excess fat.
Step 5
Starting at the cavity end of the chicken, carefully run your fingers between the skin and flesh of the breast and then the thighs to loosen the skin. Spread the butter mixture evenly under the skin of the bird, covering the thighs and the breast.
Step 6
Let the chicken come to room temperature (about 30 minutes). Meanwhile, preheat oven to 220°C.
Step 7
Brush the chicken with canola oil and season with salt. Place chicken on its back in a roasting pan. Scatter garlic and thyme evenly around it.
Step 8
Roast chicken for about 35 - 45 minutes, or until golden brown and temperature registers 70°C in the meatiest portions of the chicken - the thighs and under the breast where the thigh meats the breast.
Step 9
Transfer chicken to a cooling rack and allow it to cook for 15 minutes. Serve the chicken in quarters, arranged on a serving platter and garnish with garlic and thyme.

Cereal Chicken

I’ve tried making cereal prawns several times, but I’ve never attempted using chicken in place of prawns. My cousin was coming over for dinner, and since she was allergic to prawns, I decided to tweak my usual cereal prawn recipe. The result was surprisingly delicious – the chicken was juicy and the cereal and curry leaves added flavour and fragrance. Though I personally prefer cereal prawns to cereal chicken still, this would make for a good alternative. If you prefer, you can use thinly sliced chicken strips instead, though the chicken may be less tender.

Cereal Chicken
Serves 4 (as a side)

Ingredients:
2 large piece of chicken breast meat, lightly tenderised
1 tsp corn flour
2 tsp light soy sauce
1/4 tsp pepper
1/4 tsp sesame oil
oil for frying

1 tbsp unsalted butter
1 tbsp vegetable oil
2 cloves of garlic, chopped finely
6 sprigs of curry leaves, rinsed and dried, stalks removed
1 chilli padi, thinly sliced (remove seeds if preferred)
3/4 cup Nestum cereal
1 tsp sugar
1/2 tsp salt

Method:

  1. Tenderise chicken with a tenderiser.
  2. Marinate chicken breast with corn flour, soy sauce, pepper and sesame oil. Cover and set aside in the fridge for at least 30 minutes.
  3. In a skillet, heat oil over a medium flame.
  4. Fry chicken breast till light brown on both sides. Chicken should be just cooked through.
  5. Allow to cool slightly before cutting into slices. Set aside.
  6. In a clean skillet or wok, heat butter and oil.
  7. When butter has melted, add garlic, curry leaves and chilli and fry till fragrant.
  8. Add in sliced chicken and mix well.
  9. Add in sugar, salt and cereal and mix well. Do not overdo this step or cereal will not be crispy.
  10. Serve hot with steamed white rice.


Chicken and Century Egg Porridge

Porridge is one of my comfort foods on a cold rainy day, or when I am recovery from a flu. It is simple to prepare, feeds a large number of people easily, and best of all, has a low glycemic index! Did you know that porridge has a GI index of 42-45, in comparison with steamed rice, that has a whooping GI index of 98? To find out more about the glycemic index, you can refer to my earlier post here.

There are two styles of porridge that I cook at home – Hokkien Style or Cantonese Style. Hokkien style porridge is what you usually get when you visit economic rice stalls and ask for porridge. The rice grains can still be seen, and the porridge is typically watery. Cantonese style porridge is what you get when you go to a restaurant such as Crystal Jade, or any dim sum place and ask for porridge. It is thicker and the grains are not very visible.

My mom prefers the Hokkien Style porridge with separate dishes of ingredients, while my husband prefers the Cantonese style porridge. The recipe below is for the latter.

Chicken and Century Egg porridge
Serves 4

Ingredients:
2 cups of rice, washed and drained dry
1/2 tsp salt
1 tsp oil

4 cups of water
2-3 cups of chicken stock
3 dried scallops
200g chicken breast meat, sliced
3 century eggs, cubed

salt and pepper to taste
2 stalks of spring onions, chopped
sesame oil

Method:

  1. Mix salt and oil into drained rice and set aside for 20 minutes.
  2. In a large pot, bring water and chicken stock to a boil. Stir in rice and dried scallops.
  3. Allow porridge to boil over a medium high flame for 10 minutes, and add in the chicken slices.
  4. Reduce flame and allow porridge to simmer, stirring once in a while.
  5. When porridge is almost ready (approximately 20 – 30 minutes), add in century egg cubes. Porridge should be of a smooth consistency.
  6. Add salt and pepper to taste.
  7. Dish out into bowls and garnish with spring onion, pepper and sesame oil.
  8. Serve hot.