Chef Icon Bakery

Chocolate Trovana I stumbled upon this bakery through an advertisement I saw on facebook. Chef Icon Bakery prides itself in being a nature bakery – they use no artificial ingredients or artificial fats. Seems like a perfect place to shop for a birthday cake for my daughter.

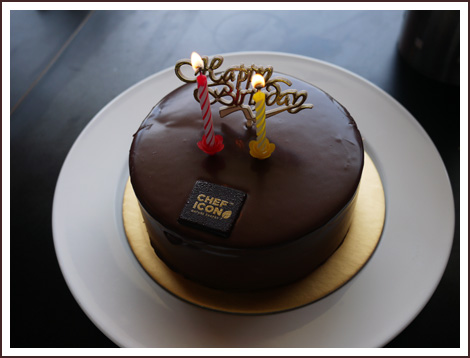
I went there in the afternoon with my husband to shop for a birthday cake and was promptly recommended their signature Chocolate Trovana. The signature cake comes in sizes of 500g, 1kg and 2kg and prior ordering is required. Looking at the array of cakes, we decided to stop for tea too.

Chef Francis was very friendly and recommended that we tried one of his cheesecakes if we liked cheesecakes. He promised that his cheesecakes were very different, and different they were. Even the cookies for the oreo cheesecake base were baked in the shop. His reason? Commercial oreo cookies contained preservatives. Such dedication to his nature baking concept indeed!

We finally decided to try the mango cheesecake and we were definitely not disappointed. The cheesecake was very light, unlike other baked cheesecakes that I’ve tried. Despite it’s lightness, the cake definitely did not lose its flavour. The mango fragrance permeated the cake; every bite was a delight. We were so busy eating the cake that we forgot to take a nice photo of it! Alas, there’s always a chance for visit two.

Now, back to the Chocolate Trovana cake we ordered. The verdict is found below.

chef_icon2 
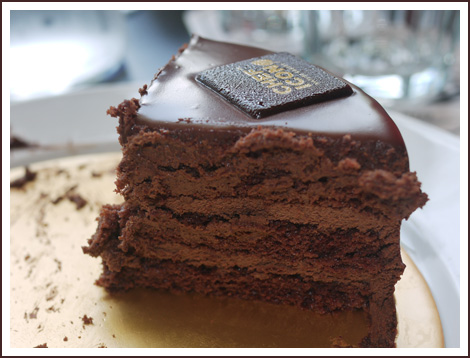
The layers of chocolate mousse and chocolate cake together with the rich chocolate ganache formed a heavenly combination. The cake was velvety smooth and very rich in chocolate flavour. Thankful that I only bought the 500g cake as a small slice goes a long way. This cake is highly recommended. Possibly the best chocolate cake I’ve tasted in a long while.

So where can you find Chef Icon?

Chef Icon Bakery
5 Kampong Bahru Rd
Singapore 169341
Phone: +65 9337 3900Mon – Sat: 8am to 8pm

Red wine chocolate bundt cake

Disclaimer: This cake is NOT suitable for children consumption.

I love bundt pans because they are easy to handle, produce moist cakes and the large bundt pans produce cakes that feed a small crowd! That coupled by the fact that they look pretty without elaborate decorations, and that they are easy to divide and slice up (the patterns serve as a guide for servings), I think I should be baking bundts more. I was given a cheaper bundt pan years ago, but didn’t quite fancy it as it tended to stick despite being greased and floured. A year back, I purchased a few Nordicware bundt pans and have been sold ever since.

I baked this last Saturday for my CG mates. Originally, I just wanted to bake a simple chocolate cake but I stumbled upon a recipe that incorporated red wine into the chocolate cake. I thought, why not? The results? A moist and flavourful cake, made more delicious by a double glaze of red wine black berry sauce and milk chocolate ganache. To make the cake slightly more friendly for pregnant and breastfeeding mothers in the CG, I boiled the red wine mixture a little longer. You don’t have to, though.

Red Wine Chocolate Cake
Makes 1 large bundt
Adapted from Kiss my Bundt

Ingredients:

For the bundt cake
2 cups all-purpose flour
3/4 cups dutch-processed cocoa powder
1 1/4 tsp baking powder
1 1/4 tsp baking soda
1/2 tsp salt
1 1/2 cups sugar
2 eggs
1 cup whole milk
1/2 cup vegetable oil
1/2 cup water
1/2 cup dry red wine

For the blackberry red wine glaze
4 tbsp seedless blackberry jam
1/3 cup dry red wine

For the chocolate ganache
1/2 cup heavy cream
4 oz milk chocolate or dark chocolate

Method (for bundt cake):

  1. Preheat oven to 175°C
  2. Sift flour, cocoa powder, baking soda, baking powder and salt in a large bowl. Mix in sugar and set aside.
  3. Using a standing mixer, combine eggs, milk and oil. Beat on medium speed for about 1 minute.
  4. Turn the mixer speed to low and add in the dry ingredients, half a cup at a time.
  5. Meanwhile, combine water and wine and bring to a boil
  6. When batter is combined, slowly add in water and wine mixture. The batter will be quite thin.
  7. Pour into 10-C bundt pan that has been greased and floured and bake for about 45 minutes or until a cake tester comes out clean.
  8. Invert onto cooling rack and allow to cool for an hour before frosting.

Method (for blackberry red wine glaze)

  1. Whisk red wine and blackberry jam in a small saucepan over medium heat
  2. Bring mixture to a boil and let it boil for 1 – 2 minutes (the glaze will thicken)
  3. Remove from heat and let it cool for 5 minutes before spooning it over cooled bundt cake

Method (for chocolate ganache)

  1. In a small saucepan, bring cream to a near boil (hot but not boiling)
  2. Pour hot cream over chocolate in a large bowl and whisk till smooth
  3. Spoon over the blackberry red wine glaze on the cooled bundt cake


Brown Velvet Rose Cakes

velvetcake2

My rose bundt pan finally arrived in the mail and I simply had to make something with it. Since I had leftover buttermilk, I decided to try making red velvet cakes. Yes, RED velvet cakes. How did they end up brown then? Simply when you don’t add enough red food colouring, which was what happened. Sigh, the problem with gel food colourings and liquid food colourings is that you don’t quite know how much to substitute each for when the recipe calls for one or the other. Estimation does not always yield the best results. Oh well, the next time I try this again, I would know better.

I decided to do a slight twist to the basic red velvet recipe by adding coffee extract, since coffee typically complements chocolate. I think it tastes pretty good, but I will definitely up the amount of coffee extract the next time I redo this. The adapted recipe below shows my recommended dose of coffee extract.

velvetcake

So how does red velvet taste like? It is not overwhelmingly chocolaty but the texture is fantastic – moist and dense. People typically serve this with a cream cheese topping but I was lazy and decided to serve it plain. My friends did not complain so I guess it’s good enough to be eaten on its own too.

Brown Velvet Rose Cakes
 
Brown velvet rose cakes are the result of a traditional red velvet cake made without the red colouring. It tastes every bit as good though!
Author:
Recipe type: Cake
Serves: 16
Ingredients
  • 1¼ cup canola oil
  • 1 cup buttermilk
  • 2 eggs at room temperature
  • 2 tbsp liquid food colouring
  • 1 tsp white wine vinegar
  • 1 tsp vanilla extract
  • 2 tbsp coffee extract
  • 2½ cup all-purpose flour
  • 1¼ cup sugar
  • 1 tsp baking soda
  • ¾ tsp fine salt
  • 1 tbsp cocoa powder
Instructions
  1. Preheat oven to 350ºF with a rack centered in the middle.
  2. Using a standing mixer, combine oil, buttermilk, eggs, food colouring, vinegar, vanilla and coffee extract. Beat on medium speed for 1 minute.
  3. In a medium bowl sift together flour, baking soda, salt, cocoa powder and sugar.
  4. With the mixer on low, add dry ingredients to the batter ½ cup at a time. Add slowly so that the mixture does not form lumps.
  5. Lightly grease the pan and pour batter into each cavity till they are ⅔ full.
  6. Bake until inserted toothpick comes out clean, about 20 minutes.
  7. If frosting, cool completely first.


Dark Chocolate Ice Cream

Many would agree that there are few foods as seductive as good, dark chocolate. Combine that with ice cream and it can become an almost out-of-the-world treat. I especially enjoy dark chocolate ice cream when I am feeling down, or am in a pensive mood. I like it served on its own, as that allows me to fully appreciate the full flavours of the dark chocolate. Not that it does not go well with waffles, souffles, cakes and other desserts.

The ice cream recipe I used is adapted from Pierre Herme’s Chocolate Desserts. He wrote about how good chocolate ice cream should never be made with cocoa powder, but with real dark chocolate. He doesn’t believe in using custards in chocolate ice creams as the yolks interfere with the rich flavour of the dark chocolate. Hence, chocolate ice creams are made using the Philadelphia method. After tasting the ice cream, I must say that I agree with his conclusions. Each spoonful was pure chocolate and it was sheer delight.

Dark Chocolate Ice Cream
Makes 3/4 litres
Adapted from Chocolate Desserts by Pierre Hermes

Ingredients:
1/3 cup powdered milk
3 cups whole milk
1/3 cup sugar
8 ounces Valrhona Manjari 64%, finely chopped

Method:

  1. Place the powdered milk in a heavy-bottomed medium saucepan and gradually whisk in the whole milk.
  2. When the powdered milk is dissolved, whisk in the sugar and bring the mixture to a boil.
  3. Stir in the chocolate and bring it to the boil again.
  4. Remove the pan from the heat and pour it into a small bowl. Place the small bowl in a larger bowl filled with water and ice-cubes.
  5. Keep the chocolate over ice, stirring frequently until it reaches room temperature.
  6. Churn the ice cream in an ice-cream maker.

Chocolate Pear Pudding Cake

Ever had those days where you needed a dessert but had too little time? Well, yesterday was one of those days. Hubby and I had a wedding to attend in the afternoon but were also invited to dinner at a lovely couple’s place. Determined to bring along something home-baked for dessert and so started browsing through my collection of recipe books in the morning. I decided to try something from Nigella Express, a cookbook I rarely used. I had but one “small” problem. The recipe called for canned pears and we had none. Canned pears are not very common around here and I knew that I could probably only find it in the better supermarkets. I decided that I’d grab the pears after the wedding and attempt to finish the dessert in the short amount of time I had between the wedding and the dinner. This will definitely put Nigella Express to the test – could it deliver good food, fast?

I managed to find the pears in a decent supermarket after the wedding and proceeded home to start on the cake. I finished the preparations in about 20 minutes (my hubby helped to grease the pan and line the pears in the pan). The baking took another 30 minutes. The results? A delicious moist chocolate pudding cake that our host couple and their children (and ourselves of course) enjoyed. Definitely a recipe worth keeping.

Chocolate Pear Pudding Cake
(Makes one square cake, 8″ X 8″)
Adapted from Nigella Express

Ingredients:
1 large can pear halves in juice (About 465g drained weight)
3/4 cup sugar
3/4 cup + 1 tbsp plain flour
1/4 cup cocoa (dutch-processed)
5 oz unsalted butter
1 tsp baking powder
1/4 tsp baking soda
2 eggs (room temperature)
2 tsp vanilla extract

Method:

  1. Preheat oven to 400ºF. Grease an 8 inch square pan with butter.
  2. Drain pears and arrange them in the base of the dish.
  3. In a food processor, blitz butter and sugar till smooth. Add in eggs, roughly beaten and vanilla extract and blitz till combined.
  4. Lastly, add in flour, cocoa, baking powder and soda and blitz till you have a soft and smooth batter.
  5. Spread the batter over the pears and bake in the oven for 25 – 30 minutes.
  6. Let it stand for 5 to 10 minutes and then cut into 9 slices. Serve with chocolate sauce or vanilla ice-cream.

Tip: To get a gooey molten centre in the cake, do not overbake!

Warm Chocolate Raspberry Tart

I was looking through the photo albums on my computer a few days ago and realised that there were many pictures (and recipes) that I meant to write about but never found time to. So this is catch up time. Hopefully, I will be able to put up as many recipes and pictures of the food we cooked/baked this year before the year ends.

This warm chocolate tart was seriously, hands down, the best one that I’ve made. I attribute this not just to the excellent quality of chocolate used (I used Valrhona Manjari), but also Pierre Herme’s superb sweet tart dough recipe. This can be made with or without the raspberries but I really think that they are so much better with. The tang of the raspberries complement the mild sweetness of the chocolate oh so very well. The velvety texture of the chocolate ganache filling is almost seductive. Have I convinced you to try this recipe yet?

Tart crust
Makes two 22-24 cm tart shells
Recipe adapted from Pierre Herme’s Chocolate Desserts

Ingredients:
142g unsalted butter (room temperature)
75g icing sugar, sifted
50g finely ground almond flour
1/4 tsp vanilla bean paste
1/4 tsp salt
1 large egg (room temperature)
245g plain flour

Method:

  1. Place butter in the bowl of a food processor fitted with the metal blade and pulse, scraping down the sides of the bowl as needed, until creamy.
  2. Add the icing sugar and process to blend.
  3. Add the almond flour, salt and vanilla and continue to process till smooth.
  4. Add eggs and process to blend.
  5. Finally, add in the flour and pulse till mixture starts to come together. Stop when the dough starts to gather into a ball. Do not overwork the dough.
  6. Gather dough into a ball and divide it into 2 pieces.
  7. Press each piece into a disc and wrap with plastic wrap. Allow the dough to rest in the refrigerator for at least 4 hours or up to 2 days.
  8. The dough can be kept frozen for up to a month when wrapped airtight.
  9. To bake, butter a tart ring. On a lightly floured surface, roll the dough to a thickness of between 2 – 4 cm, lifting the dough often and making certain that the work surface and the dough are amply floured at all times.
  10. Roll the dough up around your rolling pin and unroll it onto the tart ring. Fit the dough into the bottom and up the sides of the ring, then run the rolling pin across the top of the ring to cut off the excess.
  11. Prick the dough all over with a fork and chill it for at least 30min in the refrigerator.
  12. Preheat oven to 350ºF. Fit a circle of baking parchment into the crust and fill with dried beans or rice.
  13. Bake for 18-20 mins, then remove the parchment and beans and bake for another 3-5 mins, until shell is golden.
  14. Transfer to a rack to cool.

The filling

Ingredients:
55g raspberries
145 bittersweet chocolate
115g unsalted butter, cut into cubes
1 large egg, stirred with a fork (at room temperature)
3 large egg yolks, stirred with a fork (at room temperature)
2 tbsp sugar

Method:

  1. Center a rack in the oven and preheat the oven to 375ºF.
  2. Fill the cooled tart crust with raspberries.
  3. Melt the chocolate and the butter in separate bowls in a bain marie or in a microwave.
  4. Allow them to cool until they just feel warm to the touch (104ºF).
  5. Using a small whisk or spatula, stir the egg into the chocolate, stirring gently in widening circles and taking care not to agitate the mixture. Do not beat air into the ganache.
  6. Slowly, stir in the egg yolks little by little, followed by the sugar.
  7. Finally, stir in the warm melted butter.
  8. Pour the ganache over the raspberries in the tart shell.
  9. Bake the tart for 11 mins, not more. The centre of the tart will still jiggle, but it will set.
  10. Allow to cool for 10 min before serving.

Brownie Cupcakes

I baked these some time ago for a gathering of students at my place. If you are a chocolate fan, these brownie cupcakes will be straight down your alley. Sinfully rich and chocolaty, they are bound to fix your chocolate craving. The best part? They are not difficult to make at all! The ingredients are simple, but the sheer quantity of butter, sugar and eggs may shock you. Well, they are for a large batch of cupcakes afterall, and didn’t I say earlier that these were sinful?

Brownie Cupcakes
(Makes 60 cupcakes)
Recipe adapted from Gourmet, Dec 1999

Ingredients:
16 oz unsalted butter, cut into cubes
8 oz bittersweet chocolate (I use Valrhona equatorial)
1 3/4 cups all purpose flour
1/2 cup unsweetened cocoa powder
1/4 tsp salt
3 1/4 cups sugar
8 large eggs

Method:

  1. Preheat oven to 350ºF. Line muffin tray with liners.
  2. Melt butter and chocolate in a heavy saucepan over moderately low heat, stirring till smooth.
  3. In a separate bowl, whisk together flour, salt and cocoa powder.
  4. Remove saucepan from heat and whisk in sugar.
  5. Add eggs, 1 at a time, whisking after each addition until incorporated.
  6. Lastly, fold in flour mixture until just blended.
  7. Spoon batter into muffin liners, filling the liner almost to the top. Bake for 25 – 30 mins. A skewer inserted will have some crumbs adhered when the cupcakes are done.
  8. Cool for 5 minutes in tins and remove to cool on a rack.
  9. Repeat with the remaining batter.
  10. These can keep in an air-tight container for about 2 days at room temperature.