Pandan Snow Skin Mooncakes

Pandan snow skin mooncakes

Mid-autumn festival is approaching and I’m back on the blog after a 2 months hiatus. I gave birth to my 2nd baby girl two months ago (she’s such a cutie) and have had my hands rather full. Now that she is slightly older, hopefully I’d have more time to blog (fingers very crossed). But I digress. Let’s go back to mooncakes.

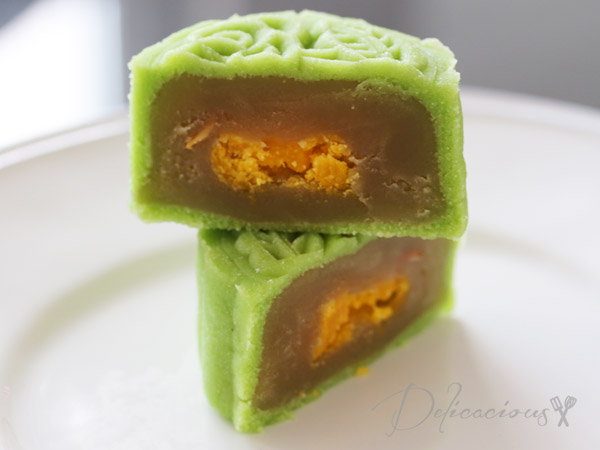
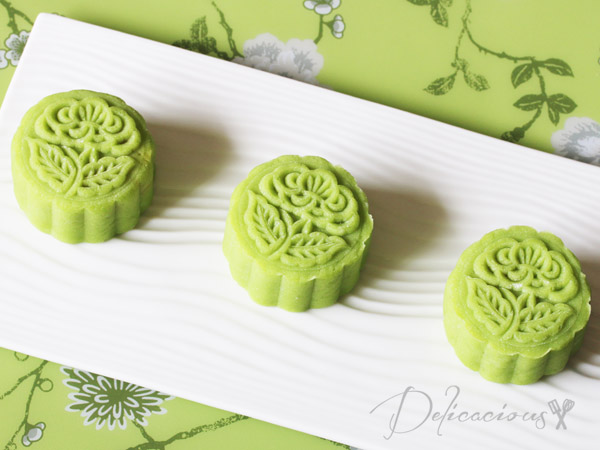
I have fond memories of mini pandan snow skin mooncakes that my mom would buy from this old fashioned bakery near Alexandra during Mid-autumn festival. I was probably in my teens then and to me, those were really delicious snow skin mooncakes. They were freshly made, had a strong pandan flavour and the snow skin was very soft. Unfortunately, the bakery closed down a couple of years later and I couldn’t find similar mooncakes. So a couple of years ago, I decided to start making my own. One of the more popular mooncakes I’ve made are these Red Wine Berry Snow Skin Mooncakes.

Pandan Snow Skin Mooncakes

Continue Reading

Very Chocolatey Salted Brownies

Very Chocolatey Salted Brownies

Home renovation is depressing. Even when it’s just renovation of the toilets, the whole house gets messed up. One of the worse parts of renovation? I am deprived of my kitchen and my oven. I wish I could start baking with a vengeance once my renovation is over but with the baby due to arrive just a few weeks, that does not seem very likely either.

Anyway, while browsing through my food photos, I realised that I have not shared my favourite brownie recipe on the blog! These recipes are rich and fudgey and the salt on the top gives it extra crunch. I like to add some chocolate chips to the batter to give it a little extra bite but you can omit these if you prefer.

Very Chocolatey Salted Brownies
 
Serves: 16
Ingredients
  • 170g unsalted butter
  • 60g dark chocolate chips/chunks (I use 70% dark chocolate)
  • 45g unsweetened cocoa powder
  • 110g plain flour
  • 220g granulated sugar
  • 3 eggs
  • 1½ tsp vanilla extract
  • ½ tsp sea salt
  • ¼ cup semi-sweet chocolate chips (I use 55% dark chocolate) - optional
Instructions
  1. Preheat oven to 175°C.
  2. Line a 9-inch square baking pan with alumnium foil and coat lightly with non-stick baking spray.
  3. Melt butter and chocolate chips over a water bath or using a microwave, stirring occasionally.
  4. Allow butter and chocolate mixture to cool slightly.
  5. Sift flour and cocoa powder over the chocolate mixture and whisk in till combined.
  6. Whisk in the sugar till combined, followed by the eggs, one at a time.
  7. Lastly, whisk in the vanilla extract and salt.
  8. Fold in the extra chocolate chips if desired.
  9. Pour batter into the baking pan and smooth out the top using a spatula.
  10. Bake for 30 - 35 minutes, or until the centre is just slightly soft.
  11. Allow to cool in the pan for an hour. Refrigerate the brownies for 1 - 1.5 hours to allow them to set completely.
  12. Remove brownies from pan and peel off the aluminium foil.
  13. Cut brownies into squares and sprinkle a little extra sea salt on top.
  14. Serve at room temperature.

Breakfast Series – Easy Honey Whole Wheat Rolls

Easy Honey Whole Wheat Rolls

The last post was supposed to be the last of the breakfast series posts, but I decided that I had one last favourite to share. These lovely honey whole wheat rolls. I love them because they are healthy, fluffy and simply delicious. My little one loves them! I’ve made them plain, and have also successfully incorporated raisins and chocolate chips in the dough to make raisin rolls and chocolate chip rolls. The best part? These rolls freeze very well. I freeze the extras and pop them into the toaster oven on busy days to get fresh hot rolls.

Do you want to find out how to make these breakfast rolls? I’ve shared the recipe at The Best Blog Recipes so hop on over now!

Breakfast series – Red Bean Anpan Buns

Red Bean Anpan Bun

In what may be the last of the breakfast series posts (for now), I’m happy to introduce you to my latest favourite bake – Red Bean Anpan Buns. I’ve made these in pretty flower shapes, and also as plain round buns. Either way, they are delicious and the smell of freshly baked anpan buns wafting from the oven will definitely make you want to eat these up, almost straight out of the oven. I had to practice self-control and reserve them for breakfast the next day! The bread dough can be prepared using a breadmaker with a dough setting function (the easier way) or using a standing mixer with a dough hook.

The buns will taste best with homemade anko (sweet red bean paste made with azuki red beans). If you don’t have the time to make your own, you can replace with store bought red bean paste. For a simple method on preparing the red bean paste, please refer to my post here.

Red Bean Anpan Bun

Breakfast series - Red Bean Anpan Buns
 
Serves: 9
Ingredients
Dough
  • ½ cup + 1 tbsp milk
  • 1 egg
  • 2⅓ cup bread flour
  • 2 tbsp caster sugar
  • ½ tsp salt
  • 0.5 oz butter, softened
  • 1 tsp active dry yeast
Filling and topping
  • 9 oz of red bean paste, divided into 9 balls
  • 1 tbsp melted butter/vegetable oil
  • black sesame seeds
Instructions
Using a breadmaker
  1. Add ingredients into the breadmaker pan following instructions on your breadmaker for dough setting.
  2. When dough is ready, remove dough from pan and divide it into 9 equal sized balls.
  3. Allow the dough balls to rest covered for 15 minutes.
  4. Gently flatten dough balls and place the red bean filling in the centre. Carefully fold dough over to enclose the red bean paste. Shape into a ball and lightly flatten it. Using your finger, make a slight indentation in the centre of each flattened ball.
  5. Use a pair of kitchen scissors to cut 5 deep cuts around the flattened ball to make a floral shape (optional).
  6. Preheat oven to 190°C.
  7. Set aside on a non-stick baking sheet, covered, for about 15 minutes.
  8. When the buns have almost doubled in size, bake them in the centre rack of the preheated oven for 15 minutes.
  9. Once buns are golden brown, remove them from the oven and brush them with melted butter. This gives the buns a nice shiny golden colour. Sprinkle sesame seeds on top.
  10. Cool buns on a wire rack.
Using a standing mixer with dough hook
  1. Mix milk, egg, flour, salt and sugar together in the bowl of a standing mixer.
  2. Add the soften butter and knead for 8 - 10 minutes using a dough hook. The dough is ready when it is smooth and elastic.
  3. Transfer dough to a clean bowl. Cover with plastic wrap and allow to rise in a warm place till it doubles in size.
  4. Divide dough into 9 pieces.
  5. Follow the rest of the instructions from the breadmaker portion on shaping the dough.


Breakfast Series – Wholewheat Blueberry Cheesecake Muffins

blueberry cheesecake muffins

If you are a frequent visitor to Delicacious, you would have noticed that there are several muffin recipes. In fact, there are several variations of muffin recipes just for blueberry or berry muffins. One of my favourite thus far are these Whole Wheat Honey Berry Muffins. These Blueberry Cheesecake Muffins however, are making it fast to the top of the favourites list. The inspiration hit when I had some cream cheese left over from baking a cheesecake and the little one asked for blueberry muffins. How about a muffin with some cream cheese in the centre? Sounds good doesn’t it? I wanted a whole wheat muffin, and so I opted to use half whole wheat and half plain flour in this recipe. You can however, substitute the plain flour for whole wheat flour if you prefer.

I have since made these muffins at least three times and each time, my little one loved it. I have substituted strawberries in place of blueberries and the muffins have turned out great too! It’s a very versatile recipe. Do try it!

Breakfast Series - Wholewheat Blueberry Cheesecake Muffins
 
Serves: 12
Ingredients
  • 1¼ cup whole wheat flour
  • 1 cup plain flour (you may substitute with whole wheat flour)
  • ¼ tsp salt
  • 4 tsp baking powder
  • 2 eggs, lightly beaten
  • 3½ oz unsalted butter, melted and cooled
  • ¼ cup honey
  • 1 cup milk
  • 5 oz blueberries
  • 2 oz cream cheese, cut into 12 pieces
Instructions
  1. Preheat oven to 200°C and centre an oven rack. Place 12 paper muffin cases on a baking tray.
  2. In a large mixing bowl, whisk together flours, salt and baking powder. Set aside.
  3. In a large measuring cup, whisk together butter, honey, eggs and milk.
  4. Pour wet ingredients into the flour mixture and using a whisk, stir gently to combine. Do not overmix.
  5. Fold in blueberries.
  6. Half fill each muffin case with the mixture. Place a piece of cream cheese in the centre. Evenly distribute the rest of the muffin mixture among the 12 cases.
  7. Bake for 15 - 20 minutes, or until muffins are golden brown.

This post is shared at these blogs.

Breakfast Series – Potato pancakes with scrambled eggs and cheese

potato pancakes

Here’s a continuation of the breakfast series on Delicacious! This time, I’m sharing a recipe for savoury potato pancakes, topped with creamy scrambled eggs and a knob of cream cheese. Yummy! In the past, my family enjoys going out for weekend breakfast or brunch. We usually choose a location near to a park or playground so that my little one can run around too. Lately though, the rising costs of food prices and the dropping of food standards at some of our preferred haunts have resulted in us preparing weekend breakfasts at home. Not a bad thing, I must say.

These savoury potato pancakes were popular both with the hubby and my little one. They are crisp on the outside and soft on the inside. The scrambled eggs and cream cheese enhanced the flavours of the pancake. You can be creative and add smoked salmon or crisp bacon atop the scrambled eggs too!

I shared the recipe for this delicious breakfast at The Best Blog Recipes. Hop over and check it out!

Breakfast series – Japanese Hot Cakes

japanese hot cakes

What’s the difference between japanese Hot Cakes and our usual pancakes? Well, japanese hot cakes are thicker and sweeter. They are very popular, and many use the Morinaga hot cake mix. Delicious though they are, they can be a little hard on the pocket, especially if you have many mouths to feed. Some time back, I came across a recipe on a japanese sweets website. As the instructions were all in japanese (and google translate was not very accurate), I had to fiddle around with it before getting it right. I also changed the ingredients slightly. The method for preparing the hot cakes is also slightly different from preparing pancakes. If you follow the instructions though, you should be able to get thick delicious hot cakes! It’s definitely cheaper than using the Morinaga hot cake mix too!

Breakfast series - Japanese Hot Cakes
 
Ingredients
  • 1 egg
  • 40g caster sugar
  • A pinch of salt
  • 110g milk
  • 40g sour cream
  • 20g unsalted butter, softened
  • 140g cake flour, sifted
  • 1½ tsp baking powder
  • 1 tsp vanilla extract
Instructions
  1. Whisk egg with sugar and salt till pale and thick.
  2. In a separate bowl or measuring jug, combine the milk, sour cream and butter.
  3. Add the milk mixture to the egg and sugar mixture and whisk to combine.
  4. Add the flour and baking powder to the wet ingredients in three parts. Fold in gently with the whisk. The mixture will be thick.
  5. Set mixture aside for about 10 minutes.
  6. Meanwhile, set aside a damp cloth and heat a griddle pan or cast iron pan over medium heat.
  7. Add a little oil (not too much) and spread evenly over the surface of the pan.
  8. Before cooking the hot cakes, place the pan on the damp cloth to cool the pan down slightly.
  9. Scoop ¼ cup of hot cake batter and pour it onto the pan from a height of about 25 cm.
  10. When bubbles form, flip the hot cake over and cover the pan for 1 - 2 minutes. Remove hot cake and repeat with the remaining batter.
  11. Serve hot, with butter and maple syrup.