Almost healthy blueberry crumb cake

blueberry crumb cake

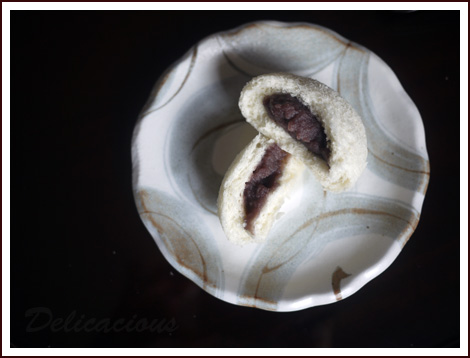
I am a terrible blogger. I discovered how terrible I was recently when I got myself onto Google+ and found out there was so much more to food blogging than I ever knew. Planning a blog post? You mean people plan blog posts and not just post whenever they fancy. Ah… but the knowledge is good. Now to start becoming more organised.

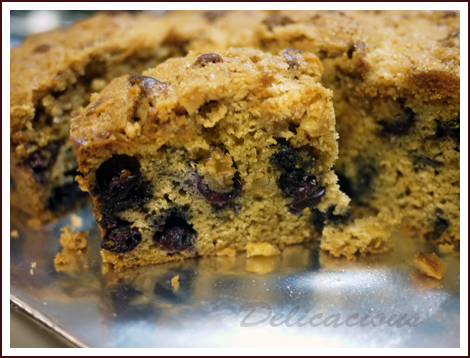
You see, I seldom plan what to bake/cook these days. It is usually a case of “oh the kid slept early today, now what can I bake?” or “I think these blueberries have been lying around the fridge for a little too long, I should do something about them”. So it happens when those two statements fall on the same night, I bake blueberry crumb cake.

Now read crumb cake and you know that it has a streusel topping. I love streusel topping though it is probably way too sweet for my good and so I usually compensate by reducing the sugar in the cake. This time round, I attempted to ease my conscience by substituting half of the flour with whole wheat flour.

I brought this to work and colleagues loved it. Serve it with coffee or tea if you like. I was happy to eat it on its own.

Almost healthy blueberry crumb cake
 
Ingredients
Streusel topping
  • 2.5 oz unsalted butter, at room temperature
  • ¼ cup caster sugar
  • ¼ cup light brown sugar
  • ⅓ cup whole wheat flour
  • ¼ tsp salt
  • ½ cup chopped walnuts
Cake
  • 2 cups fresh blueberries
  • 1 cup plus 2 tsp plain flour
  • 1 cup whole wheat flour
  • 2 tsp baking powder
  • ½ tsp baking soda
  • ¼ tsp salt
  • ¼ tsp ground cinnamon
  • ½ cup light brown sugar
  • grated zest of 1 lemon
  • 3 oz unsalted butter, at room temperature
  • 2 eggs, at room temperature
  • 1 tsp vanilla extract
  • ½ cup milk
Instructions
  1. Preheat oven to 175°C and place a rack in the centre of the oven.
  2. Spray an 8-inch square baking pan with non-stick spray.
  3. Using a fork, combine the ingredients for the streusel topping (except the walnuts) together.
  4. Stir in the walnuts and keep covered with cling wrap and refrigerated until required.
  5. Toss blueberries with 2 teaspoons of plain flour.
  6. In a large bowl, sift remaining plain flour, whole wheat flour, baking powder, baking soda, cinnamon and salt. Whisk to combine.
  7. In the bowl of a standing mixer, rub sugar and zest together with fingertips until sugar is moist and fragrant.
  8. With the paddle attachment, cream sugar with butter at medium speed till light.
  9. Add eggs one by one, beating for about a minute after each addition.
  10. Beat in the vanilla extract.
  11. Reduce mixer speed to low and add in the flour mixture and milk alternately, starting and ending with the flour mixture.
  12. The batter will be thick. Stir in the blueberries with a rubber spatula.
  13. Pour batter into the prepared pan and smoothen out the top.
  14. Break refrigerated streusel topping into pieces and scatter over the top of the cake.
  15. Bake for about 60 minutes, until the top is golden brown.
  16. Transfer cake to a rack to cool.
  17. Serve warm or at room temperature.
Notes
Recipe adapted from "Baking, from my home to yours"

This post is shared at Foodie Friday at Rattlebridge Farm and Simple Living and Eating and Freedom Fridays.

Toasted Oatmeal Muffins

oatmeal muffins 1

First thought that comes to mind when someone mentions oatmeal muffins? Do the words dry, bland, gummy come into mind? Well I was not quite a fan of oatmeal muffins, but THIS oatmeal muffin is very different. For one, it does not use oats whole, but uses toasted ground oatmeal. It has a distinct taste of oats with a fragrance likened to popcorn. Intrigued?

I came across this article on my Cook’s Illustrated magazine on oatmeal muffin. Those of you who read Cook’s Illustrated will know that they spend extended time testing recipes and refining them. They suggested that toasting and grinding up the oatmeal allows it to absorb liquid quickly, while giving it flavour. Who would have thought of doing that?

oatmeal muffins 2

Since I had an unopened packet of oats sitting around, I decided to give the recipe a try. Although muffins are typically fast to prepare, this one does take time. So if you are intending to make this muffin for breakfast, plan ahead! I didn’t and so my starving family had a late breakfast. Also, the original recipe calls for a streusel topping which I find sweet. I removed the streusel topping and added some raisins instead to sweeten up the muffin a little.

The resulting muffin was fragrant and moist. It went very well with jam and my family enjoyed it. This was baked in conjunction with Cook For Family‘s event which ends today.

Toasted Oatmeal Muffins
 
Recipe type: Muffins
Serves: 12 muffins
Ingredients
  • 2 tbsp butter
  • 2 cups rolled oats
  • 1¾ cups all-purpose flour
  • 1½ tsp salt
  • ¾ tsp baking powder
  • ¼ tsp baking soda
  • 6 tbsp butter, melted
  • 1¼ cup light brown sugar
  • 1¾ cups milk
  • 2 large eggs
  • 1 cup raisins
Instructions
  1. Using a non-stick spray, grease a 12-cup muffin tray.
  2. Melt 2 tbsp butter in a skillet.
  3. Add oats and cook, stirring frequently until oats turn golden brown.
  4. Transfer oats to a food processor.
  5. Process until finely ground, about 30 seconds.
  6. Add flour, salt, baking powder and baking soda and pulse till combined.
  7. In a large mixing bowl, whisk butter and sugar together till thick and smooth.
  8. Add milk and eggs and whisk till smooth.
  9. Using a large whisk, fold half of oat flour mixture into the egg mixture.
  10. Fold in remaining oat flour gently.
  11. Add raisins and stir to combine.
  12. Allow batter to sit for 15 minutes to thicken.
  13. Preheat oven to 190°C and place an oven rack in the middle position.
  14. Using an ice cream scoop, divide batter equally among 12 muffin cups. The batter should fill each cup to the brim.
  15. Bake for about 20 minutes till muffins are golden brown and a tester inserted in the middle comes out clean.
  16. Allow muffins to cool on wire racks for 10 minutes.
  17. Serve warm, or allow them to cool completely before storing.
Notes
Adapted from Cook's Illustrated magazine Muffins are best eaten the day they are baked. They can be kept in the fridge for up to 3 days and toasted before eaten.

I link up at these parties.

Steamed Red Bean Buns (Tau Sar Pau)

red bean buns1

Two weeks ago, my mother went for a class to learn how to make steamed red bean buns. A few days later, she tried to replicate the recipe with not-so-successful results. The bread of the buns tasted weird, and the red bean filling was grainy. Needless to say, she was rather discouraged even though we tried to render support by eating a few of the buns.

red bean buns 2

So on Saturday, in preparation for Mother’s Day, I decided to make my version of steamed red bean buns. I combed through many variations of making red bean paste and pau dough, and came up with my own variation. It was a success! True, it was much work making the red bean paste from scratch and it required some forward planning, something that is not my forte. But the results were rewarding – especially when the red bean paste actually tastes like red bean, and not some sweetened mush that you buy in a packet.

red bean buns 3

My husband participated in the making of the buns too! His favourite activity? Making animal faces. He became very popular with my daughter after she saw this little piggy. His effort disappeared in a couple of minutes though, as my daughter declared that she was going to eat the piggy soon after she saw it.

So you’ve decided that you want to embark on the journey of making your very own steamed buns? Here are some photo tips.

red bean paste steps

  1. When straining the red bean paste into the bowl, immerse the sieve into the red bean water. This will help remove the skins. After straining the paste twice, you should get a water red bean paste mixture.
  2. When squeezing out excess water, be careful not to squeeze out too much water. The paste should not be crumbly, and you should be able to form indentations with a spoon or finger.
  3. When mixing the red bean paste with sugar, the paste will become more fluid and glossy. Mix until you obtain the thickness of paste that you desire.
  4. The completed red bean paste should look like this.
  5. Guide to making steamed buns
  1. Ensure that your yeast is active. It should foam like shown in the picture.
  2. After kneading in the mixer (or by hand), the dough should be smooth and should not be sticky. Shape it into a ball and allow it to rest.
  3. It should triple in volume.
  4. Knead the dough gently and divide the dough into 14 equal pieces (my pieces are not very equal). This dough handles very easily.
  5. Enclose the red bean paste filling by forming little pleats and pinching the dough towards the centre. This forms the base.
  6. Ensure that your buns are spaced at least 2 – 2.5 inches apart as they will expand when they steam.

So now you are ready to try to make your own steamed buns!

Steamed Red Bean Buns (Tau Sar Pau)
 
A recipe on making steamed red bean buns (tau sar pau) from scratch! Make your own red bean paste (tau sar) and sweeten it according to your taste.
Recipe type: Bread
Cuisine: Chinese
Serves: 14
Ingredients
Red Bean Paste (Tau Sar)
  • 1 cup of red beans
  • ¾ to 1 cup of sugar
Dough
  • 3 tbsp sugar
  • ⅞ cup warm water
  • 11/2 tsp dried yeast
  • 3 cups Hong Kong flour
  • 11/2 tsp baking powder
  • 1 tbsp shortening
Instructions
Red Bean Paste
  1. Soak red beans in water overnight. The water should cover the red beans.
  2. Pour away the water used to soak the red beans.
  3. In a large pot, add the soaked red beans. Add water to the pot - it should be about 1 inch above the red beans.
  4. Bring to a boil over a medium flame and turn off the flame. Allow it to stand for about 10 minutes. Pour away the hot water.
  5. Fill the pot once again with water till about 1 inch above the red beans.
  6. Bring to a boil and then turn the flame down.
  7. Simmer for about 1 hour, or until red beans are soft.
  8. Sieve the red beans and water into a large bowl.
  9. Using a metal spoon, mash the red beans in the sieve, leaving only the red bean skins behind. Repeat till all the red beans are mashed and skins removed. Wash the sieve.
  10. Sieve the red bean paste and water through the sieve to remove any bits.
  11. Using a cheesecloth bag, squeeze out excess water from the red bean paste and water mixture.
  12. Put the paste into a metal pot over medium heat. Add sugar (according to your taste) to the paste and stir in a back and forth motion till the sugar dissolves. The paste will become more fluid.
  13. Continue to stir in a back and forth motion until you reach the desired thickness for your paste.
  14. Optional: If you'd like your paste to be more glossy, you can fry your red bean paste in 1-2 tbsp of vegetable oil after the last step.
  15. Allow red bean paste to cool to room temperature. Keep in fridge until required.
  16. Shape red bean paste into 1 oz balls and set aside till dough is ready.
Dough
  1. In a bowl, dissolve sugar in warm water.
  2. Sprinkle yeast on the surface of the water and allow it to foam (about 10 minutes).
  3. Meanwhile, sift flour and baking powder into the bowl of a standing mixer prepared with a dough hook.
  4. Add shortening.
  5. When the yeast mixture foams, add it to the flour mixture in the mixer bowl.
  6. Knead the dough using the mixer for about 5-7 minutes, until it is smooth and does not stick. (If using hands, this step takes about 10-12 minutes).
  7. Remove dough from the mixer bowl and shape it into a ball.
  8. Place in a large clean bowl and cover with cling wrap.
  9. Allow it to rise in a warm place till it triples in volume.
  10. Remove from the bowl and knead it slightly to remove some air.
  11. Divide the dough into two portions and roll each portion into a log.
  12. Divide each log into 7 equal pieces.
  13. Shape each piece with your palm till it is a 10-12cm in diameter circle.
  14. Add a ball of red bean paste to the centre. Enclose the red bean paste by forming neat pleats and folding towards the centre. Place the folded side on a piece of small baking paper.
  15. Repeat till all the dough and paste has been used up.
  16. Let the buns stand for about 15 minutes before arranging them in a bamboo steamer. The buns should be about 2 inches apart as they will expand.
  17. Steam for 10 minutes.
  18. Serve hot or cool to room temperature and freeze.

Homemade Granola

Homemade Granola The idea of making granola came the day after I accidentally bought a second pack of rolled oats, thinking that my box of rolled oats had expired. My helper reminded me that those were rather new too, and so being stuck with two packs of rolled oats, I knew I better be using them rather quickly.

So yesterday, it being the first day of the school holidays and I having to entertain my easily-bored two year old toddler, I decided to involve her in making granola. She had great fun scooping and pouring the rolled oats with this very cute whale measuring cup that I bought earlier from ToTT, stirring the mixture and sticking in her grubby little fingers every once so often. Sensory play for her perhaps?

Perhaps the only troublesome thing about making granola is having to check the oven quite frequently to stir up the mixture so that the granola bakes evenly. I neglected to check it for just a tat bit longer and it browned more in certain regions. Still it was delicious, definitely much more delicious than store-bought granola. The bub couldn’t wait for it to come out of the oven, declaring that it was hers.

Today’s breakfast? Granola, served up with cold milk.

Homemade Granola

Ingredients

  • 2 1/2 cups rolled oats
  • 1 cup sliced almonds
  • 3/4 cups golden flaxseed
  • 3/4 cups shredded coconut
  • 2 tablespoons dark brown sugar
  • 1/2 teaspoon sea salt
  • 2 tablespoons maple syrup
  • 2 tablespoons honey
  • 2 tablespoons vegetable oil
  • 1/2 cup dried cranberries
  • 1/2 cup raisins

Directions

Step 1
Preheat oven to 170°C. Position two racks near the middle of the oven.
Step 2
In a large bowl, stir together rolled oats, almonds, flaxseed, coconut and brown sugar.
Step 3
In a small bowl or measuring jug, whisk together oil, maple syrup and honey.
Step 4
Pour honey mixture into large bowl with oats and mix well with a spatula.
Step 5
Spread mixture onto two baking pans and bake for 20 minutes, stirring often to ensure even roasting.
Step 6
After 20 minutes, rotate pans and bake for another 15-20 minutes till evenly golden brown.
Step 7
Allow to cook before stirring in raisins and cranberries.
Step 8
Store in airtight containers.

Blueberry Streusel Top Muffins

blueberry struesel top muffins I baked blueberry muffins… again. Yes, my husband’s colleague asked him a couple of days back when he brought these to work, “You guys really like blueberries, don’t you?” Well, we do. Most importantly, my two year old loves them. They are healthy. They contain lots of antioxidants. Enough said.

Though no one really gets tired of blueberry muffins, I do try to modify them to make them more interesting. A couple of weeks ago, I tried some muffins that a friend made – they had streusel topping. She said it was an allrecipe.com recipe, so I decided to search for them and found them. Since the streusel topping did not sound too healthy, I decided to ease my conscience slightly by replacing part of the flour with wholewheat flour and cutting down on the sugar content.

The result was a lovely moist muffin, with delicious streusel topping. The amount of topping can be varied according to your preference. I was rather generous for this batch but don’t they appear beautiful? 🙂

Blueberry Streusel Top Muffins

Serves 15 muffins
Website adapted from all recipes.com

Ingredients

muffin

  • 2 cups all purpose flour
  • 3/4 cups whole wheat flour
  • 1/2 cup Caster sugar
  • 1 teaspoon salt
  • 4 teaspoons baking powder
  • 1 lemon (zested)
  • 2/3 cups vegetable oil
  • 2 eggs
  • 2/3 cups milk
  • 1 1/2 cup fresh blueberries

topping

  • 1/2 cup caster sugar
  • 1/3 cup all purpose flour
  • 1/4 cup butter (grated while cold)
  • 1 1/2 teaspoon ground cinnamon

Directions

Step 1
Preheat oven to 200°C. Line muffin trays with cups.
Step 2
Sift flours, salt and baking powder together in a large bowl. Add sugar and stir to combine.
Step 3
In a separate bowl, add vegetable oil, egg and milk. Whisk to combine.
Step 4
Add Egg mixture to the dry ingredients. Mix till just combined.
Step 5
Fold in blueberries. Fill muffin cups till 3/4 full.
Step 6
Toss together ingredients for streusel topping. Combine them together with a fork.
Step 7
Sprinkle topping on top of muffin batter.
Step 8
Bake for 20 - 25 minutes, or until a tester comes out clean.

American Pancakes

Pancakes make a simple yet satisfying breakfast and I make it quite often. I like to explore various pancake recipes, and although I like whole grain pancakes (using whole wheat flour only), my daughter is not a fan. This recipe is tweaked from one that I found online to include wheat bran. Feel free to replace it with more flour if you do not have wheat bran.

I found these pancakes fluffy with a nice slightly cakey texture. My daughter quite enjoyed it! I say quite because she has been very fussy with food lately – blame it on the teething.

Try this recipe and let me know what you think!

American Pancakes

Serves 2
Prep time 15 minutes
Cook time 15 minutes
Total time 30 minutes
Allergy Egg, Milk, Wheat
Meal type Breakfast
Misc Child Friendly, Freezable
Website BBC Food recipes

Ingredients

  • 100g plain flour
  • 30g wheat bran
  • 1 1/4 tablespoon baking powder
  • 1/2 teaspoon salt
  • 2 tablespoons sugar
  • 130ml milk
  • 1 egg
  • 2 tablespoons melted butter, cooled

Directions

Step 1
Sift dry ingredients (flour, bran, salt, sugar, baking powder) into a large bowl.
Step 2
In a separate bowl, whisk eggs, milk and melted butter together.
Step 3
Add wet ingredients to dry ingredients and whisk to obtain a smooth batter. Let batter stand for 3 - 5 minutes.
Step 4
Heat a non-stick pan and add a small knob of butter (or olive oil if you prefer).
Step 5
Add approximately half a cup of batter, and allow it to bubble and rise. Turn it over and cook till the other side is golden brown as well.
Step 6
Serve with butter and maple syrup.

Whole wheat strawberry muffins

Muffins are easy to make because they do not require a mixer, just gentle folding in by hand. It is really quick to prepare, as long as you have all your ingredients on hand. While most muffin recipes use all purpose flour, I prefer to use whole wheat flour because it’s healthier, contains more nutrients and flavour. Here, I share one of my favourite muffin recipes. It is simple and the ingredients can easily be replaced to give you a variety of muffin flavours. Should you find the flavour of whole wheat flour too strong, feel free to replace half of it with all purpose flour. Whole wheat flour can be obtained from most good supermarkets such as Cold Storage or NTUC Finest. Try this easy and healthy recipe and you would never need to buy muffins again!

Strawberry Muffins
Makes 12-15 muffins

Ingredients
1 1/2 cup whole wheat flour
1/3 cup brown sugar
1 1/2 tsp baking powder
1/4 tsp baking soda
1/4 tsp salt
4 oz unsalted butter, melted and cooled
1 cup sour cream
1 egg
1 tsp vanilla extract
1 1/2 cup chopped strawberries

Method:

  1. Preheat oven to 205°C. Line a muffin tray with 12 – 15 muffin liners (depending on the size)
  2. In a large bowl, sift together flour, baking powder, baking soda, salt and sugar.
  3. In another bowl, combine melted butter, sour cream, egg and vanilla.
  4. Add butter mixture to dry ingredients and mix till just combined. Do not overmix!
  5. Gently fold in strawberries.
  6. Divide batter among muffin cups and bake in the middle of the oven for 20 minutes, or until a tester comes out clean.

Variations can be made by adding the following in place of strawberries

  • 1 1/2 cup of fresh blueberries
  • 1 1/2 cup of mashed banana
  • 1 1/2 cup of chopped apple + a dash of cinammon
  • 1 cup of chopped apple + 1/2 cup of almonds/pecans
  • 1 cup of dried cranberries + 1/2 cup of white chocolate chips