Warm Chocolate Raspberry Tart

I was looking through the photo albums on my computer a few days ago and realised that there were many pictures (and recipes) that I meant to write about but never found time to. So this is catch up time. Hopefully, I will be able to put up as many recipes and pictures of the food we cooked/baked this year before the year ends.

This warm chocolate tart was seriously, hands down, the best one that I’ve made. I attribute this not just to the excellent quality of chocolate used (I used Valrhona Manjari), but also Pierre Herme’s superb sweet tart dough recipe. This can be made with or without the raspberries but I really think that they are so much better with. The tang of the raspberries complement the mild sweetness of the chocolate oh so very well. The velvety texture of the chocolate ganache filling is almost seductive. Have I convinced you to try this recipe yet?

Tart crust
Makes two 22-24 cm tart shells
Recipe adapted from Pierre Herme’s Chocolate Desserts

Ingredients:
142g unsalted butter (room temperature)
75g icing sugar, sifted
50g finely ground almond flour
1/4 tsp vanilla bean paste
1/4 tsp salt
1 large egg (room temperature)
245g plain flour

Method:

  1. Place butter in the bowl of a food processor fitted with the metal blade and pulse, scraping down the sides of the bowl as needed, until creamy.
  2. Add the icing sugar and process to blend.
  3. Add the almond flour, salt and vanilla and continue to process till smooth.
  4. Add eggs and process to blend.
  5. Finally, add in the flour and pulse till mixture starts to come together. Stop when the dough starts to gather into a ball. Do not overwork the dough.
  6. Gather dough into a ball and divide it into 2 pieces.
  7. Press each piece into a disc and wrap with plastic wrap. Allow the dough to rest in the refrigerator for at least 4 hours or up to 2 days.
  8. The dough can be kept frozen for up to a month when wrapped airtight.
  9. To bake, butter a tart ring. On a lightly floured surface, roll the dough to a thickness of between 2 – 4 cm, lifting the dough often and making certain that the work surface and the dough are amply floured at all times.
  10. Roll the dough up around your rolling pin and unroll it onto the tart ring. Fit the dough into the bottom and up the sides of the ring, then run the rolling pin across the top of the ring to cut off the excess.
  11. Prick the dough all over with a fork and chill it for at least 30min in the refrigerator.
  12. Preheat oven to 350ºF. Fit a circle of baking parchment into the crust and fill with dried beans or rice.
  13. Bake for 18-20 mins, then remove the parchment and beans and bake for another 3-5 mins, until shell is golden.
  14. Transfer to a rack to cool.

The filling

Ingredients:
55g raspberries
145 bittersweet chocolate
115g unsalted butter, cut into cubes
1 large egg, stirred with a fork (at room temperature)
3 large egg yolks, stirred with a fork (at room temperature)
2 tbsp sugar

Method:

  1. Center a rack in the oven and preheat the oven to 375ºF.
  2. Fill the cooled tart crust with raspberries.
  3. Melt the chocolate and the butter in separate bowls in a bain marie or in a microwave.
  4. Allow them to cool until they just feel warm to the touch (104ºF).
  5. Using a small whisk or spatula, stir the egg into the chocolate, stirring gently in widening circles and taking care not to agitate the mixture. Do not beat air into the ganache.
  6. Slowly, stir in the egg yolks little by little, followed by the sugar.
  7. Finally, stir in the warm melted butter.
  8. Pour the ganache over the raspberries in the tart shell.
  9. Bake the tart for 11 mins, not more. The centre of the tart will still jiggle, but it will set.
  10. Allow to cool for 10 min before serving.

Brownie Cupcakes

I baked these some time ago for a gathering of students at my place. If you are a chocolate fan, these brownie cupcakes will be straight down your alley. Sinfully rich and chocolaty, they are bound to fix your chocolate craving. The best part? They are not difficult to make at all! The ingredients are simple, but the sheer quantity of butter, sugar and eggs may shock you. Well, they are for a large batch of cupcakes afterall, and didn’t I say earlier that these were sinful?

Brownie Cupcakes
(Makes 60 cupcakes)
Recipe adapted from Gourmet, Dec 1999

Ingredients:
16 oz unsalted butter, cut into cubes
8 oz bittersweet chocolate (I use Valrhona equatorial)
1 3/4 cups all purpose flour
1/2 cup unsweetened cocoa powder
1/4 tsp salt
3 1/4 cups sugar
8 large eggs

Method:

  1. Preheat oven to 350ºF. Line muffin tray with liners.
  2. Melt butter and chocolate in a heavy saucepan over moderately low heat, stirring till smooth.
  3. In a separate bowl, whisk together flour, salt and cocoa powder.
  4. Remove saucepan from heat and whisk in sugar.
  5. Add eggs, 1 at a time, whisking after each addition until incorporated.
  6. Lastly, fold in flour mixture until just blended.
  7. Spoon batter into muffin liners, filling the liner almost to the top. Bake for 25 – 30 mins. A skewer inserted will have some crumbs adhered when the cupcakes are done.
  8. Cool for 5 minutes in tins and remove to cool on a rack.
  9. Repeat with the remaining batter.
  10. These can keep in an air-tight container for about 2 days at room temperature.

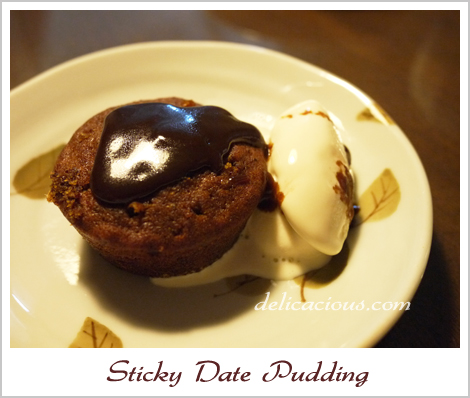
Sticky Date Pudding

The dates had been sitting in the fridge, unopened in their package for many many months. It’s a good thing that dates keep well as I have a bad habit of buying stuff and not using them. One Sunday afternoon, after flipping through a few recipe books, I decided that I would use them in a sticky date pudding. The recipe looked simple, and so, thinking that I had ample time to complete it before dinner, I busied myself with other things. To my horror, I realised a few hours later that the chopped dates needed to be soaked in hot water for an hour before they could be used. Processing of the dates (pitting them and chopping them) also took longer than expected. I ended up with a bowl of mashed dates with insufficient time to complete the recipe. So the dates (mashed this time), went back to the fridge, in a bowl covered with cling film.

A few days later (didn’t I say dates keep well?), I finally had the time to finish the recipe. And oh wasn’t it lovely. The pudding melts in your mouth and the aroma of the dates, together with the toffee sauce was simply heavenly. Family members and colleagues all loved it and I believe you would too! This is definitely a recipe worth trying.

Sticky Date Pudding
(Makes 12 small cakes)
Recipe adapted from Desserts By The Yard

Ingredients:
8 ounces pitted Medijool dates, finely chopped
1 cup boiling water
1 3/4 cups all purpose flour
1 1/2 tsp baking powder
1/8 tsp salt
1 tsp baking soda
4 ounces unsalted butter, softened
3/4 cup packed light brown sugar
1/4 cup sugar
1/4 tsp grated orange zest
1 tsp Trablit coffee extract
2 large eggs, room temperature

Method:

  1. Place the chopped dates in a bowl and pour on boiling water. Let it sit for 1 hour.
  2. Preheat the oven to 350ºF with a rack placed in the middle shelf. Butter 2 cupcake trays.
  3. Sift together flour, baking powder and salt.
  4. Mash dates in the bowl with the water. Stir in baking soda and set aside.
  5. Using a stand mixer, cream butter, brown sugar, sugar, orange zest and coffee extract on medium until fluffy.
  6. Add eggs one at a time, scraping down the bowl after each addition.
  7. Beating on low speed, alternate half the date mixture with half the flour mixture.
  8. Add in the remaining date mixture, then the flour mixture.
  9. Pour into prepared cupcake tray and place in the oven.
  10. Bake for 15 minutes, rotate the pan from front to back and bake for another 10 minutes.
  11. When the cake is done, remove from oven. While the cake is still hot, poke the cake in several places with a skewer and pour on the toffee sauce (see below).
  12. Serve warm, with vanilla bean ice-cream for extra decadence.

Toffee Sauce

Ingredients:
3/4 cup packed dark brown sugar
1 cup heavy cream
1 tbsp unsalted butter
1 tbsp vanilla bean paste
1/4 cup milk
2 tbsp light corn syrup
1 tbsp water (optional)

Method:

  1. Place the brown sugar, cream, butter, vanilla paste, milk and corn syrup in a heavy saucepan.
  2. Simmer over medium-high heat until the mixture thickens and cots the back of a spoon, about 10 minutes.
  3. Continue to cook until golden brown, 1 to 2 minutes more.
  4. Remove from heat and keep warm.

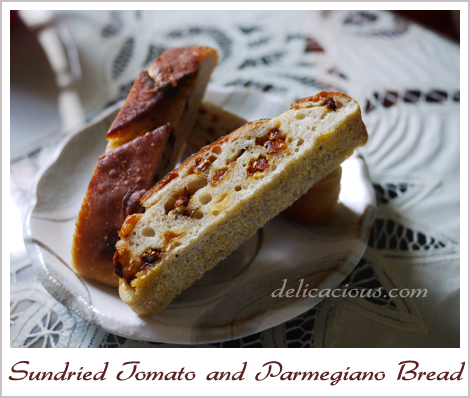
Sundried Tomato and Parmegiano Reggiano Bread

I looked through my shelves recently and realised that there were cookbooks I owned, from which I have never tried a single recipe from. I was determined to conquer at least one recipe from each book (so that I could have the excuse of buying more books), and decided to start on a bread making book – Artisan Bread in Five Minutes A Day.

I bought this book because of it’s interesting descriptions, good reviews, and of course, the hope that bread making could indeed be that simple. Well, I was fooled. It didn’t take five minutes a day. But having said that, the book does offer simple and versatile bread recipes, most of which take shorter time than traditional recipes. I decided to try the basic recipe – boule. The boule, otherwise known as an artisan free-form loaf, serves as the basic dough from which a dozen other breads can be made from. After mixing, the basic dough can be kept in a lidded container in the fridge for up to a week. Whenever you feel like making bread, you simply need to pull and cut out a piece of dough, and shape/make it into whatever fanciful (or simple) bread you desire. Using the basic recipe, I was able to make baguette, pita, and the lovely sundried tomato and parmegiano bread pictured above.

Boule:
(makes four 1 pound loaves)

Ingredients:
3 cups lukewarm water
1 1/2 tbsp yeast
1 1/2 tbsp coarse salt
6 cups unbleached all purpose flour

Method:

  1. Warm the water to about 100 – 110 degrees F. Add yeast and salt to the water in a large mixing bowl.
  2. Add all the flour at once and mix with a wooden spoon or a mixer with a dough hook. No kneading is neccessary.
  3. When all the flour is incorporated and the mixture looks uniformly moist, transfer the dough to a lidded container.
  4. Allow the dough to refrigerate overnight, or at least 3 hours.

Sun-dried tomato and Parmegiano Reggiano Bread
(Makes 1 loaf)

Ingredients:
1 pound of Boule dough
Olive oil for brushing the dough
1/2 cup sun-dried tomatoes in oil, drained and roughly chopped
1/2 cup grated Parmigiano-Reggiano cheese
Cornmeal for pizza peel

Method:

  1. Dust the surface of the refrigerated dough with flour and cut off a 1-pound piece. Dust the piece with more flour and quickly shape it into a ball by stretching the surface of the dough around the bottom on all four sides, rotating the ball a quarter turn as you go.
  2. Roll out the ball into  a 1/4 inch thick rectangle. Use flour to prevent the dough from sticking to your working surface.
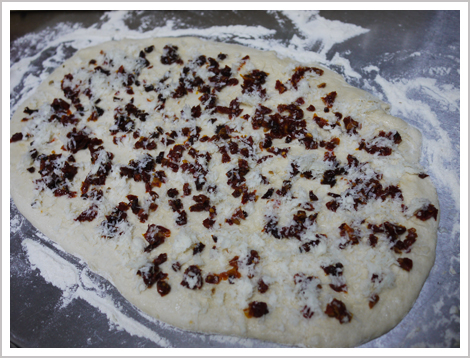
  3. Brush the dough with olive oil. Scatter the sun-dried tomatoes evenly over the dough and sprinkle the cheese over the tomatoes
    .
  4. Starting from the short end, roll the dough into a log and gently tuck the ends under to form an oval loaf.
  5. Allow to rest and rise on a cornmeal covered pizza peel for 1 hour.
  6. 20 minutes before baking time, preheat the oven to 450 degrees F, with a baking stone placed on the middle rack. Place an empty broiler tray below the rack.
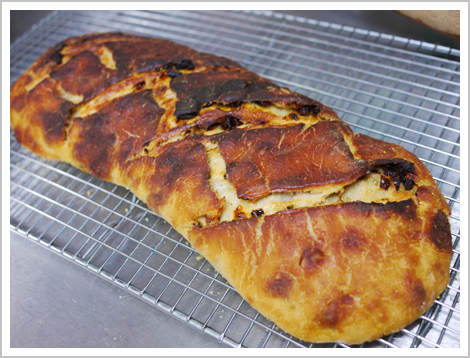
  7. Brush the top of the loaf lightly with olive oil and slash parallel cuts across the loaf using a serrated bread knife.
  8. Slide the loaf directly onto the hot stone. Pour 1 cup of hot water into the broiler tray and quickly close the oven door.
  9. Bake for 30 to 35 minutes, or until deeply browned and firm.
  10. Allow to cool before slicing or eating.

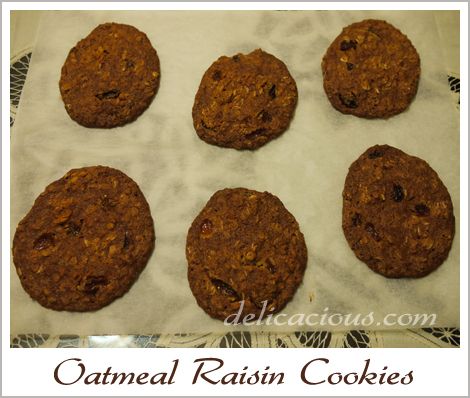
Oatmeal Raisin Cookies

I didn’t manage to take a decent photo of these cookies when I baked them – the photo that you all see above does not look very appetising but I guarantee you, these are really good chewy cookies.

The slightly modified recipe below is taken from one of my favourite books – Desserts By The Yard. The troublesome part about these cookies is that the raisins (that makes them oh so good) require special preparation. The good part about these cookies is that the dough freezes really well, and can last about a month (or slightly more) in the freezer. When you want to eat freshly baked cookies, you’d just have to take the cookie dough logs out of the freezer, slice them up, bake them and wala! Freshly baked oatmeal raisin cookies, straight from the oven.

Recipe:
(Makes 24 large cookies)

1 1/2 cups plain flour
1 tsp baking soda
7 ounces unsalted butter, softened
3/4 cup sugar
3/4 light brown sugar
1 1/2 tsp grated nutmeg
3/4 tsp ground cinnamon
2 eggs at room temperature
3 cups of rolled oats
1 1/2 cups of fat raisins (see other recipe below)

Method:

  1. Sift together flour and baking soda.
  2. Using a mixer, cream butter until lemony yellow, about 2 minutes. Add the sugar, brown sugar, nutmeg and cinnamon. Continue creaming on high speed for about 2 minutes, until the mixture is smooth and lump-free.
  3. Add eggs one at a time, scraping down the bowl and paddle after each addition. Beat on low for 15 to 30 seconds, until the eggs are fully incorporated.
  4. On low speed, add the sifted flour mixture, beating until all the flour is incorporated. Scrape down the sides of the bowl.
  5. On low speed, mix in the oats and raisins.
  6. With a rubber spatula, scoop out the dough and divide it in half. Centre one half along the bottom of a sheet of baking paper and roll up the paper, creating a log of about 2 inches wide and 12 inches long. Repeat with the other portion of dough.
  7. Refrigerate the logs for a minimum of 1 hour. The logs can be wrapped in cling film and stored for 3 days in the refrigerator or 1 month in the freezer.
  8. Preheat oven to 350 degrees F. Remove dough from parchment when it’s firm and chilled and using a serrated knife, slice 1/2 inch rounds off the log.
  9. Place the cookies on prepared baking sheets, 2 – 3 inches apart.
  10. Bake for 12 minutes, rotate the sheets from front to back and bake for another 5 – 8 minutes, until the cookies are nicely browned.
  11. Remove the parchment from the cookie sheets and allow to cool for 5 minutes before eating. Cool completely before storing.

Recipe for Fat Raisins:
(makes 1 cup)

1 cup golden raisins
1/2 cup dry white wine
2 tbsp freshly squeezed orange juice
1 tbsp dark rum
2 tbsp sugar

Method:

  1. Combine all ingredients in a small heavy saucepan, bring just to boil over medium heat, stirring continually.
  2. Lower the heat so that the liquid is at a bare simmer and poach for 20 minutes.
  3. Remove from heat, cover the pan with cling film, and allow to cool to room temperature
  4. Store in an airtight container in the refrigerator.

The raisins can keep for up to 2 weeks.

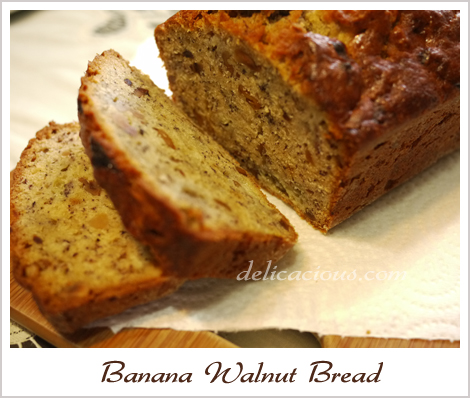
Banana Walnut Bread

Hubby bought a huge bunch of bananas some time back, and since it’s just the two of us, most of the bananas ripened (or over ripened) before we could eat them. We froze about 8 of them in a box – over ripe bananas freeze well, without their skins of course, and are delicious in all kinds of baked goods.

Seeing that I had some leftover walnuts from the not so recent mooncake making attempts, I decided to try a recipe from the book “The new best recipe“. The recipe is really simple because it does not require the use of a mixer. All the mixing can be done just with a wooden spoon and spatula. The results, as you can see from the picture above, is a moist, fragrant and very flavourful banana walnut bread. One of the best I’ve tasted, if I say so myself. Below is the slightly modified recipe that I used from the book.

Banana Walnut Bread
(Makes one 9-inch loaf)

Ingredients:
2 cups unbleached all purpose flour
1 cup of walnuts, chopped coarse
3/4 cup sugar
3/4 tsp baking soda
1/2 tsp salt
4 very ripe medium sized bananas (mashed)
1/4 whipping cream
2 large eggs, lightly beaten
6 tbsp melted and cooled unsalted butter
1 tsp vanilla extract

Method:

  1. Preheat oven to 350 degrees F and place an oven rack in the middle position. Grease and flour the bottom and sides of a 9 by 5 inch loaf pan.
  2. Lightly toast chopped walnuts on a baking sheet till fragrant.
  3. Whisk flour, sugar, baking soda, salt and walnuts together in a large bowl. Set aside.
  4. Mix mashed bananas, cream, eggs, butter and vanilla with a wooden spoon in a medium bowl.
  5. Lightly fold the banana mixture into the dry ingredients with a rubber spatula until just combined. Do not overmix.
  6. Scrape the batter into the prepared pan and bake till loaf is golden brown and a toothpick inserted in the centre comes out clean, about 55 minutes.
  7. Cool in the pan for 5 minutes, then transfer to a wire rack. Serve warm or at room temperature.
  8. The bread can be wrapped with plastic wrap and stored at room temperature for up to 3 days. It is best consumed on the day it is baked though.

Hong Kong – Tim Ho Wan

Hong Kong’s dim sum restaurant, Tim Ho Wan is hailed as the world’s cheapest Michelin Starred restaurant. At S$13 per person (especially considering the amount of food we ordered), I believe this is very much true. We chanced upon this hole in the wall when hubby came across a report on this restaurant on a food magazine. After walking for miles (because we did not quite know which MTR station to alight from), we finally arrived at the restaurant, only to realise that a huge crowd of locals had already gathered in front of the restaurant, eagerly waiting to be served brunch.


Thankfully, we didn’t have to wait beyond 30 minutes as smaller groups seemed to get seated first. We couldn’t quite decide what to order and so practically almost ordered one of each type of dim sum on the menu. While we were waiting for our food, we noticed that not far away in the kitchen, staff were busying preparing freshly made dim sum. That’s one of the major selling points of Tim Ho Wan. Instead of serving pre-made, frozen and reheated dim sum, this restaurant prides itself for serving freshly made dim sum.

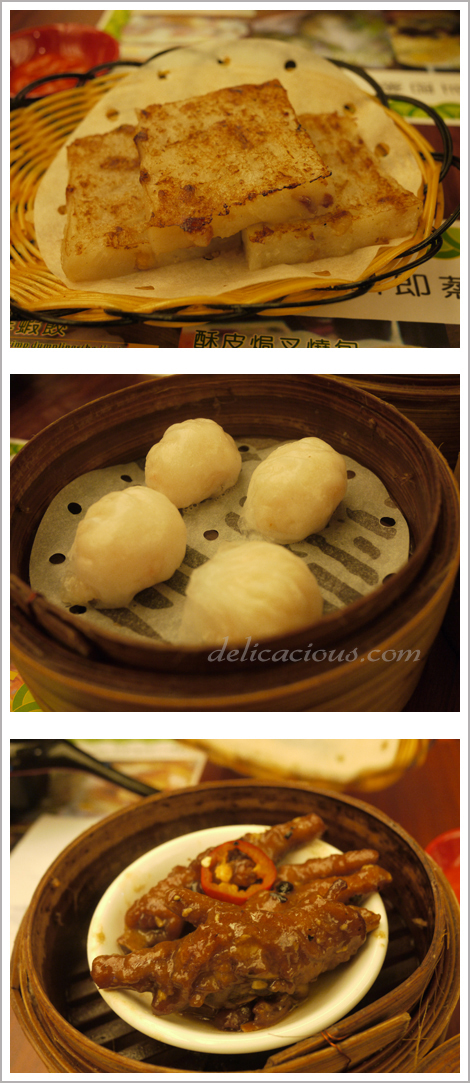
The carrot cake was delectable. It was soft yet crisp on the outside and importantly, it was not too oily or salty. The Har Gao (prawn dumplings) were fresh and succulent. One of the best I’ve tasted. And even though I am not a fan of chicken’s feet, I’d have to agree with my hubby that they prepared this dish exceptionally well.

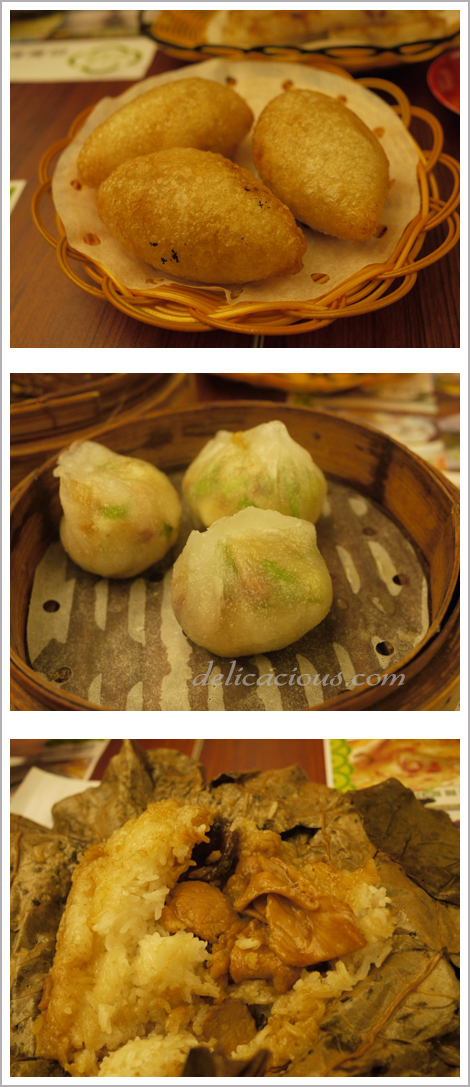
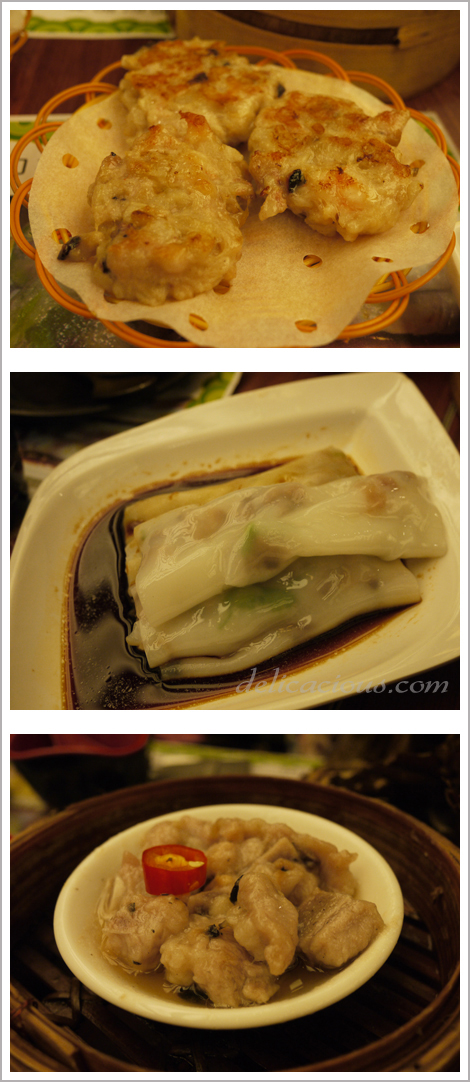
I’ve always been a fan of Ham Shui Kok (Fried salty pork dumpling?) but find that most are too chewy, with the glutinous flour portion sticking to one’s teeth. The ones served here were not too chewy, with a very fragrant interior. I should have ordered more! The crystal dumplings were filled with meat and chives. Though this was not one of my favourite items, my mom really did like it. The lotus leaf wrapped glutinous rice was probably one of the more disappointing items we ordered. Even though the fragrance of the lotus leaf permeated the rice very well, the filling was not quite as tasty as I had hoped it would be.

To be honest, I can’t quite recall what dish the first picture in this series represents. I vaguely remember that it contained arrowroot and perhaps some meat? The rice flour roll was of just the right consistency. It was not too soft, and retained a little bit of resistance when you bite into it. Just the way I like it. And the steamed pork ribs? One word: Yums.

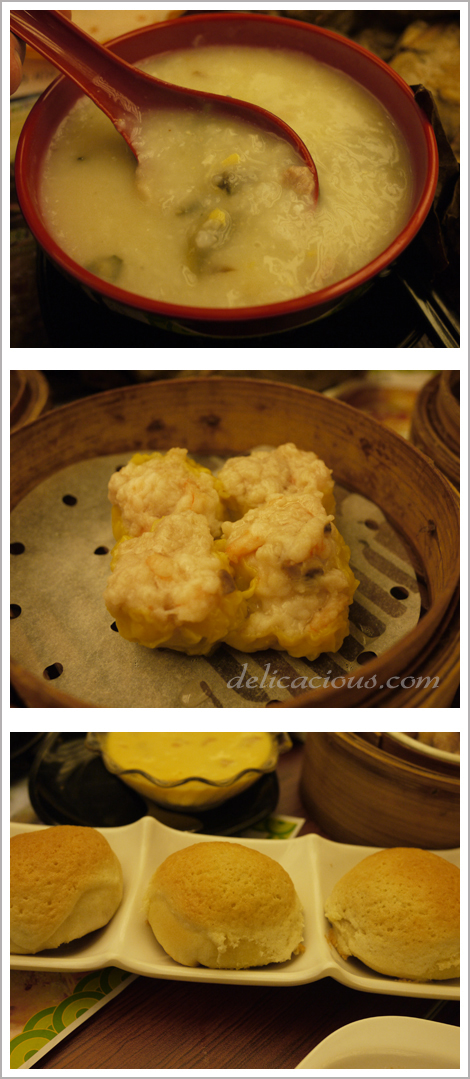
The century egg porridge was nothing spectacular. It tasted rather bland. Perhaps, this is how the locals like their porridge. The siew mai was as tasty as it’s brother, the har gao. I think the freshness of the ingredients the restaurant uses goes a long way in bringing out the flavour of their dim sum. The po luo bao was very very good. When you first take a bite, you encounter the crisp and flaky exterior, which quickly gives way to the moist and delicious centre. I could probably have eaten all three of them if I wasn’t so stuffed!

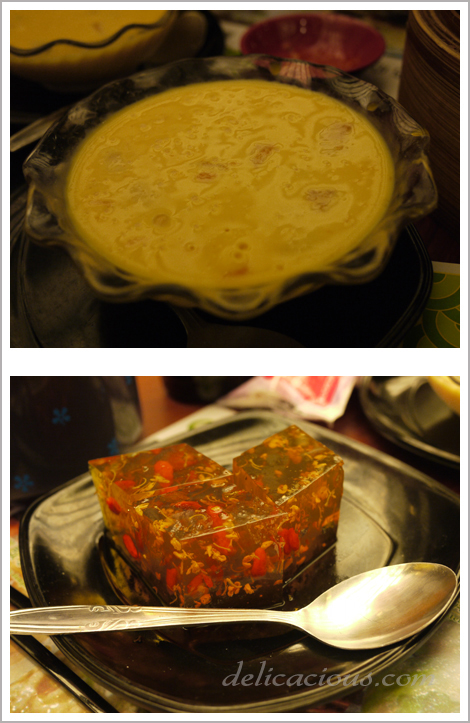
And to round things off, we ordered dessert. The mango pudding definitely did not disappoint. It was rich and creamy, with a generous portion of mango pieces within. The Osmanthus flower jelly was very interesting indeed. It was mildly sweet and had the strong fragrance of the Osmanthus flower.

And to conclude this rather long, picture heavy post, I would have to say that I strongly, highly recommend this place if you decide to pay Hong Kong a visit. Having said that however, I’d have to make a disclaimer that if you are expecting innovative, fusion dim sum, you will not find it here. But if you are like me, and prefers the traditional selection of dim sum, then Tim Ho Wan is definitely the place to visit.

Tim Ho Wan
9-11 Fuk Wing Street, Sham Shui Po